Puller Tool Guide: Everything You Need to Know
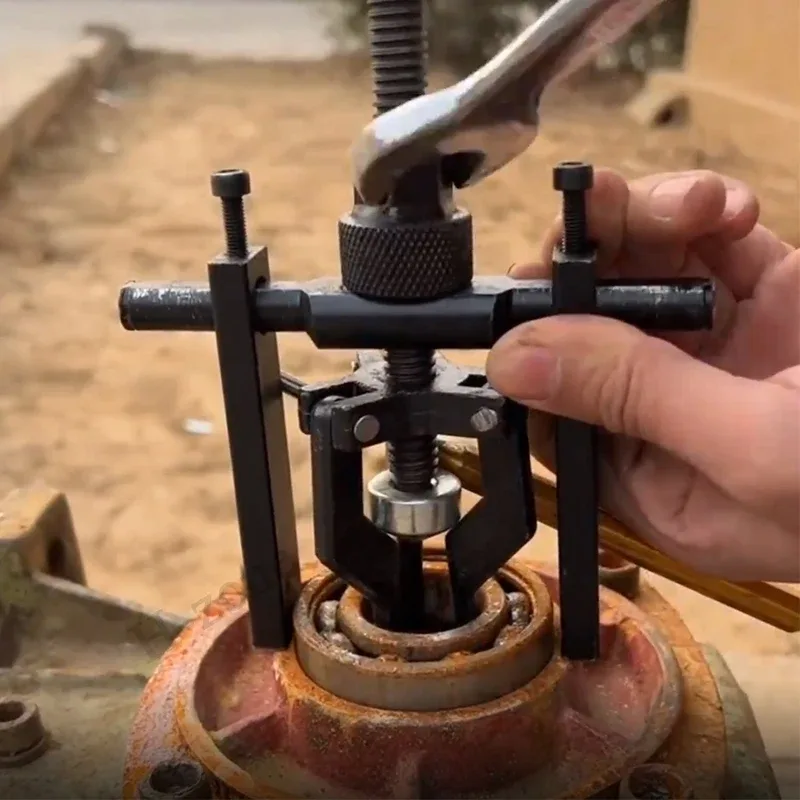
Image source: Web (Bing) / conservacion.exactas.uba.ar (Web image (fair-use with source credit))
You've probably wrestled with a stubborn bearing or seized pulley before. Prying at it with a screwdriver and a hammer doesn't just waste your time. It risks cracking the housing, marring surfaces, and sending metal shards flying into your face.
A puller tool guide helps you avoid all of that by showing you exactly which extractor fits your job.
Mechanical jaw pullers typically handle 1 to 20 tons of force, according to manufacturer specifications. Hydraulic models push well past that, but most DIY jobs fall into the lighter range. Understanding what type you need turns a frustrating battle into a straightforward procedure.
Let's walk through how pullers work and which one solves your problem.
Quick Answer
A puller tool extracts bearings, pulleys, gears, and bushings using steady mechanical force instead of prying. Jaw pullers come in 2-jaw, 3-jaw, and ring styles. Choosing the right type depends on the part geometry and how much clearance you have.
Most home projects need a basic 3-jaw mechanical puller rated for 3 to 5 tons.
The Problem: Why Removing Bearings and Pulleys Feels Impossible
Removing a part that's seated with an interference fit shouldn't feel like a fight. But those components are pressed on intentionally during manufacturing. The shaft or housing grips them tightly through friction alone.
Apply enough pressure and the bond releases cleanly. Work against it incorrectly and everything falls apart.
Most people reach for a chisel and hammer when a bearing won't budge. Forceful prying concentrates load on tiny contact points. Those stress concentrations create cracks in cast iron housings almost instantly.
Aluminum cases split open like eggshells. Even hardened steel raceways crack under uneven impact loads. That damage usually means replacing the entire assembly instead of just the worn component.
Prying also rounds off mating surfaces repeatedly. You might get the bearing loose eventually, but the shaft or bore will show deep gouges and deformation. Reinstalling a new part on a damaged surface guarantees early failure again.
The replacement bearing won't seat properly. It'll vibrate, overheat, and quit months ahead of schedule.
The real issue goes beyond just damaged parts. Wrench slips cause serious hand injuries constantly. Hammers bounce back and strike fingers or thumbs unexpectedly.
Debris launches upward at face level without any protection. OSHA documents thousands of eye injuries annually from improper tool use on shop floors.
Learn about different automotive pullers used for steering components and wheel hubs. These specialized tools address many of the same forces you deal with daily.
You don't need brute strength for this work. You need controlled, distributed force. That's exactly what the right puller delivers.
Getting it right saves parts, saves time, and keeps your hands safe.
How Puller Tools Actually Work (And Why They Save You Time)
Puller tools convert rotational torque into linear pulling force. That's the fundamental mechanism behind every design. You turn a center screw, which pushes against the shaft end or a threaded adapter.
The jaws bite behind the part being removed and hold firm. Turning continues until the interference fit yields.
Three-jaw pullers represent the most versatile design available. Each jaw moves independently along the body arms. The center screw aligns perfectly with the shaft axis automatically.
This centered application prevents tilting or binding. Even force distribution means the bearing releases uniformly instead of cocking to one side.
Two-jaw pullers serve a different purpose entirely. They excel when only one side of a part needs extraction force. Gear hubs and couplings often require this configuration.
The open side allows access where three jaws won't fit spatially. You'll find these useful alongside 3-jaw models in a complete workshop setup.
Internal ring pullers handle the trickiest jobs in this category. These tools hook inside bearing races rather than grabbing outer surfaces. You can remove tight-fitting inner races from shafts without touching the sensitive journal surface.
Proper ring pullers spread load around the race circumference evenly. That preserves the shaft's critical dimensions during removal.
Slide hammer pullers take a different approach altogether. They deliver impact force rapidly rather than steady tension. A weighted slide slides along a threaded rod and strikes the attached adapter plate.
The sudden shock breaks corrosion bonds quickly. Seized harmonic balancers and stubborn oil pump gears respond well to this method.
Hydraulic pullers replace manual turning with fluid pressure. A small hand pump generates tremendous force inside a cylinder. Two or four pulling legs transfer that force to the component.
You can extract parts rated for 50 tons or more with these systems. Industrial maintenance teams rely on hydraulic setups for heavy equipment work.
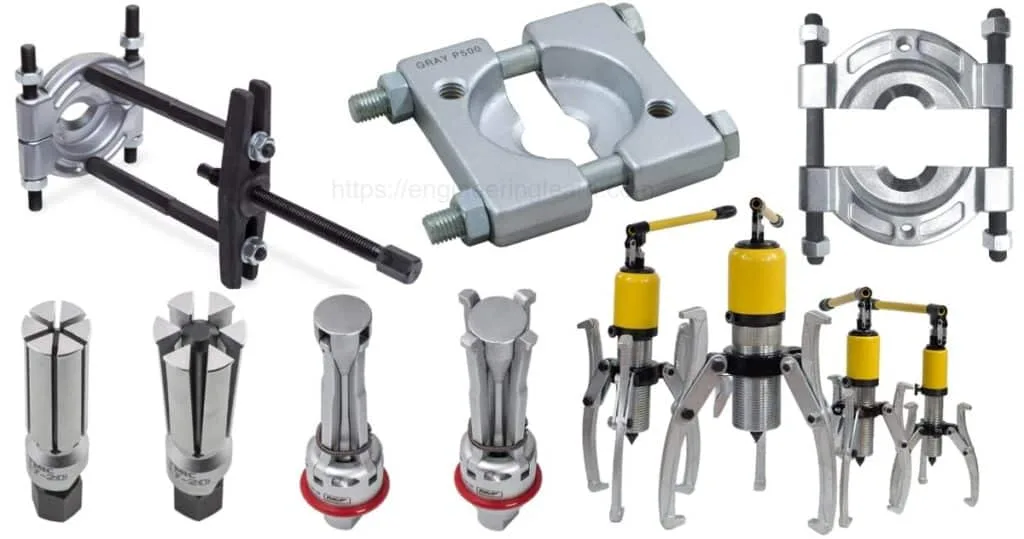
Understanding these mechanisms helps you match the tool to the task correctly. Wrong selection leads directly to the mistakes detailed in puller types explained. Getting the principle right means choosing confidently rather than guessing.
Which Puller Do You Need? A Quick Decision Guide
The right puller depends entirely on what you're removing and what space you have to work with. Match the component type to the tool style and you save hours of frustration. Try forcing a ring puller on an external bearing and you'll learn that lesson quickly.
| Component Type | Best Puller Style | Why It Works |
|---|---|---|
| External bearings on shafts | 3-jaw mechanical puller | Centered force, jaw grip on outer race |
| Internal bearing races | Ring puller with hooked legs | Hooks inside race, pulls without damaging shaft |
| Pulleys and gears with holes | 2-jaw mechanical puller | Access on one side, even spread on face |
| Seized or rusted components | Slide hammer | Impact shock breaks corrosion bonds |
| Heavy-duty industrial parts | Hydraulic puller | High tonnage with controlled application |
| Bushings and sleeves | Bearing separator kits | Targets specific press-fit depths accurately |
Two-jaw pullers handle flat-faced components that have access holes behind them. Transmission gears and motor pulleys commonly fit this category. Position the jaws symmetrically and tighten evenly.
Watch for any tilting as force builds. Stop immediately if the part begins to lean sideways.
Three-jaw models work on nearly every external bearing situation you encounter. The center screw pushes against the shaft while jaws grab the outer race. Self-centering action keeps everything aligned naturally.
This makes them the best first purchase for anyone building a workshop collection.
Ring pullers deserve a special mention for internal race removal. You slide the body through the bearing before engaging the hooked legs under the race. Tightening draws the race straight off the shaft without contacting the journal.
This protects expensive shaft surfaces from scratching or denting.
Slide hammers shine for heavily corroded or frozen assemblies. A standard puller may stall completely against seized parts. The impact shock from a slide hammer breaks loose bonds that steady force cannot.
Use penetrating oil first, let it soak, then follow up with impact if needed.
Hydraulic pullers enter the picture when force requirements exceed 20 tons. Large machine components, heavy flywheels, and industrial gear assemblies need this capability. Most home workshops never reach this threshold.
Professional shops with hydraulic systems in place handle these loads routinely.
Consider the puller types explained resource for deeper guidance on specialized applications. Matching tool style to component geometry prevents costly errors before they happen.
The Right Way to Use a Puller Tool (Step-by-Step)
Getting the part off cleanly requires following a consistent process every time. Skipping steps leads directly to the damage patterns described earlier. A methodical approach takes only slightly longer than rushing and still produces professional results.
Step 1: Assess the situation. Identify what you're removing and how it's seated. Check for set screws, retaining rings, or snap rings that must come out first. Note available clearance around the part for jaw positioning.
Measure the shaft diameter and bore size if possible.
Step 2: Apply penetrating oil liberally. Let it soak for at least 15 minutes on corroded components. Heavy rust may benefit from several hours of soak time. Warm the surrounding housing gently with a heat gun if the bearing is severely seized.
Thermal expansion loosens the interference fit temporarily.
Step 3: Position the puller correctly. For external bearings, place jaws under the outer race only. Never grip both the inner and outer race simultaneously. That pins the rolling elements between them and prevents movement.
Make sure each jaw sits flat and perpendicular to the shaft axis.
Step 4: Attach the center screw. Thread it into the shaft end or use an adapter plate if the shaft is smooth. The screw tip must contact the shaft center squarely. Off-center loading causes the puller to walk sideways under tension.
Tighten the screw hand-tight before applying any pulling force.
Step 5: Apply force gradually and evenly. Turn the screw in small increments, pausing frequently. Listen for the part releasing with a soft pop or crack. If resistance spikes suddenly, stop and reassess your setup.
Forcing a stuck component damages everything involved.
Step 6: Rotate the part while pulling if possible. Gentle rotation during extraction helps break circumferential friction bonds. This works especially well on tapered roller bearings and tapered sleeves. Spin by hand while maintaining steady screw tension.
Step 7: Inspect and clean after removal. Check the shaft and housing for scoring, galling, or deformation. Clean both surfaces thoroughly before installing any replacement. Light honing with fine emery cloth removes minor burrs safely.
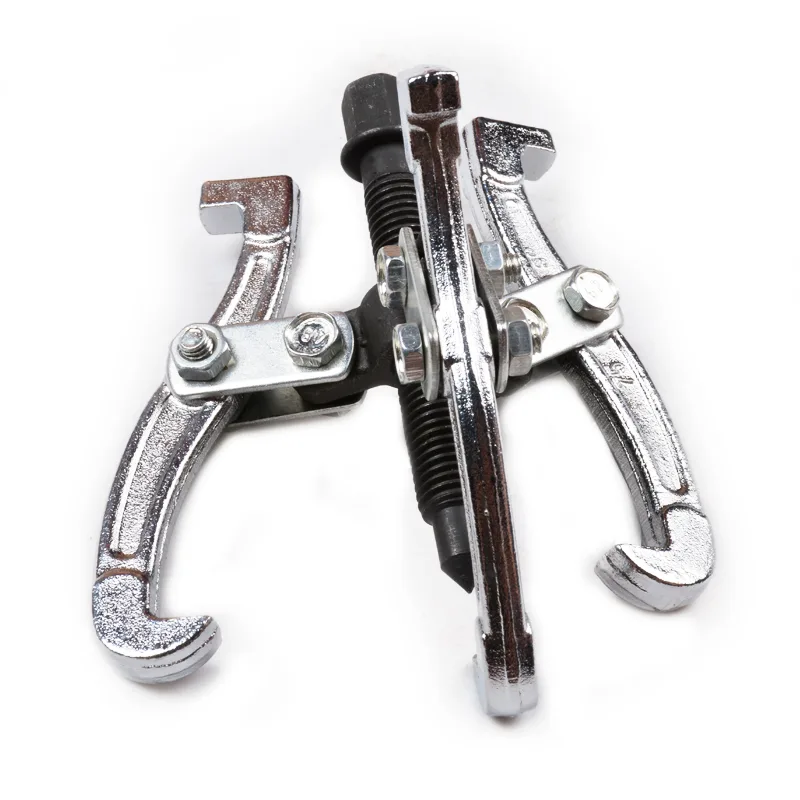
Following these steps consistently produces reliable results every time. The complete automotive puller guide covers additional techniques for steering and suspension components that benefit from the same careful approach.
Common Mistakes That Destroy Parts — and How to Avoid Them
Mistakes during puller operation are almost always preventable. Understanding what goes wrong helps you avoid the pitfalls entirely. Most damage comes from rushing, wrong tool selection, or incorrect jaw placement.
Prying on the wrong surface tops the list of destructive habits. Jaws must contact the bearing race or component face directly. Gripping the shaft underneath or the housing around the part redirects force catastrophically.
The resulting leverage bends shafts and cracks cast housings instantly. Always verify jaw contact points before turning the screw.
Over-tightening beyond material limits destroys bearings and damages puller threads. Tonnage ratings exist for a reason. Exceeding them crushes inner races, splinters outer rings, and strips center screw threads.
Stop when resistance becomes extreme. Back off slightly and retry with more penetrating oil or gentle heat instead.
Uneven jaw placement causes the puller to walk and binds the center screw. Three-jaw models self-center properly when all jaws engage simultaneously. Two-jaw designs require careful symmetrical positioning.
Check alignment visually before applying significant force. Reposition immediately if you notice lateral movement.
Ignoring set screws and retaining hardware leads to stripped threads and broken pullers. Set screws lock onto the shaft itself. Pulling against them without removal shears the screw or strips the shaft threads.
Always remove locking hardware before attempting extraction. A quick inspection prevents these headaches entirely.
Using the wrong puller type for the application creates unnecessary damage. Ring pullers on external bearings slip off and scratch shafts. External pullers can't reach inside tight housings for internal race removal.
Match the tool precisely to the component geometry before beginning work.
Shock loading with impact tools fractures brittle components unexpectedly. Slide hammers deliver controlled impact, but hammering a puller body directly destroys it. Never strike the puller legs or screw with a metal hammer.
If impact is necessary, use a brass drift or wooden mallet on the slide hammer head only.
These mistakes compound quickly under pressure. Taking time to assess each situation prevents the majority of component damage. Proper preparation accounts for nearly every failure scenario described in industry safety guidelines.
Choosing the Right Puller: Price Ranges, Specs, and What Matters
Puller tools span a wide price spectrum depending on quality, capacity, and feature set. Understanding what drives cost helps you invest wisely without overspending on unused capabilities. The cheapest option often costs more in replaced parts later.
Basic 2-jaw and 3-jaw mechanical pullers run between $15 and $60 for entry-level brands. Mid-range tools from established manufacturers cost $60 to $150 and offer better steel quality and thread protection. Professional-grade units exceed $150 but deliver significantly longer service life under heavy use.
Key specs to evaluate when shopping:
- Tonnage capacity: Choose 3 to 5 tons for automotive work. Go higher only if you regularly service heavy equipment.
- Jaw spread range: Look for 1 to 4 inches of adjustability on general-purpose models.
- Throat depth: 1 to 3 inches covers most household applications. Deeper throats help with recessed bearings.
- Center screw size: Larger diameters (half-inch to three-quarters-inch) resist stripping better than smaller threads.
- Material construction: Chrome vanadium steel offers superior strength and corrosion resistance compared to basic carbon steel.
Replacement jaws and center screws are available separately for most quality brands. Investing in a serviceable tool now saves money on replacements later. Cheap imported tools rarely carry spare parts, making them disposable by design.
Hydraulic puller kits range from $200 to $600 depending on tonnage and leg configuration. These represent significant investments best justified by regular professional use. Occasional users should rent rather than buy for heavy-duty applications.
Slide hammer assemblies with interchangeable adapters cost $30 to $120. Consider these alongside mechanical pullers for a complete extraction toolkit. Impact capability fills gaps that steady tension simply cannot address.
FAQs: Puller Tool Questions We Get Asked All the Time
Can you pull a bearing without a puller tool?
Yes, but you risk damaging the shaft or housing severely. Improvised methods like hammering or prying concentrate force unevenly. That typically cracks cast iron cases and scores precision shaft surfaces.
Using the proper puller tool protects both the component and your investment in replacement parts.
What's the difference between a 2-jaw and 3-jaw puller?
Three-jaw models self-center automatically and handle most general bearing removal tasks. Two-jaw pullers work better when only one side of a component has clearance. They're ideal for flat-faced gears and pulleys with access holes behind them.
Having both types covers nearly every situation you encounter.
How much force does a typical bearing puller need?
Most automotive bearings require between 3 and 10 tons of extraction force. Seized or corroded components may need higher capacity tools. Standard mechanical pullers rated for 5 tons handle the vast majority of home workshop projects safely and effectively.
Are hydraulic pullers worth the extra cost?
They're worth it if you regularly service heavy machinery or large industrial components. Hydraulic systems generate far more force than manual turn-screw designs. For occasional automotive or motorcycle work, a quality mechanical puller does the job just fine without the added expense.
How do you remove an internal bearing race properly?
Use a ring puller with hooked legs that engage inside the race. Slide the puller body through the bearing opening, hook the legs under the inner race, and tighten steadily. Never attempt to pry inside the bore with external tools.
Ring pullers preserve the shaft surface during this critical operation.
What causes a puller to slip or jump during use?
Jaws that aren't seated flat against the component face slip under load. Worn jaw tips lose grip progressively. Damaged or stripped screw threads allow the center screw to back out suddenly.
Inspect jaw condition regularly and replace worn tips before they cause slippage accidents.
Final Verdict: Your Puller Tool Checklist
Choosing and using the right puller comes down to matching the tool to the job and respecting its limits. Start by identifying the component type and geometry. Select the appropriate puller style, three-jaw for general bearings, ring pullers for internal races, slide hammers for seized parts.
Verify the tonnage rating exceeds your expected load. Apply steady, controlled force while watching for signs of binding or tilting. Inspect removed components for damage and clean mating surfaces thoroughly before reinstalling.
A quality mechanical puller costs under $100 and handles most automotive and home workshop tasks. Keep penetrating oil and basic hand tools nearby for preparation. Follow manufacturer safety guidelines and wear appropriate personal protective equipment throughout the process.
With the right tool selected and used correctly, bearing and pulley removal becomes a routine task instead of a frustrating battle.