


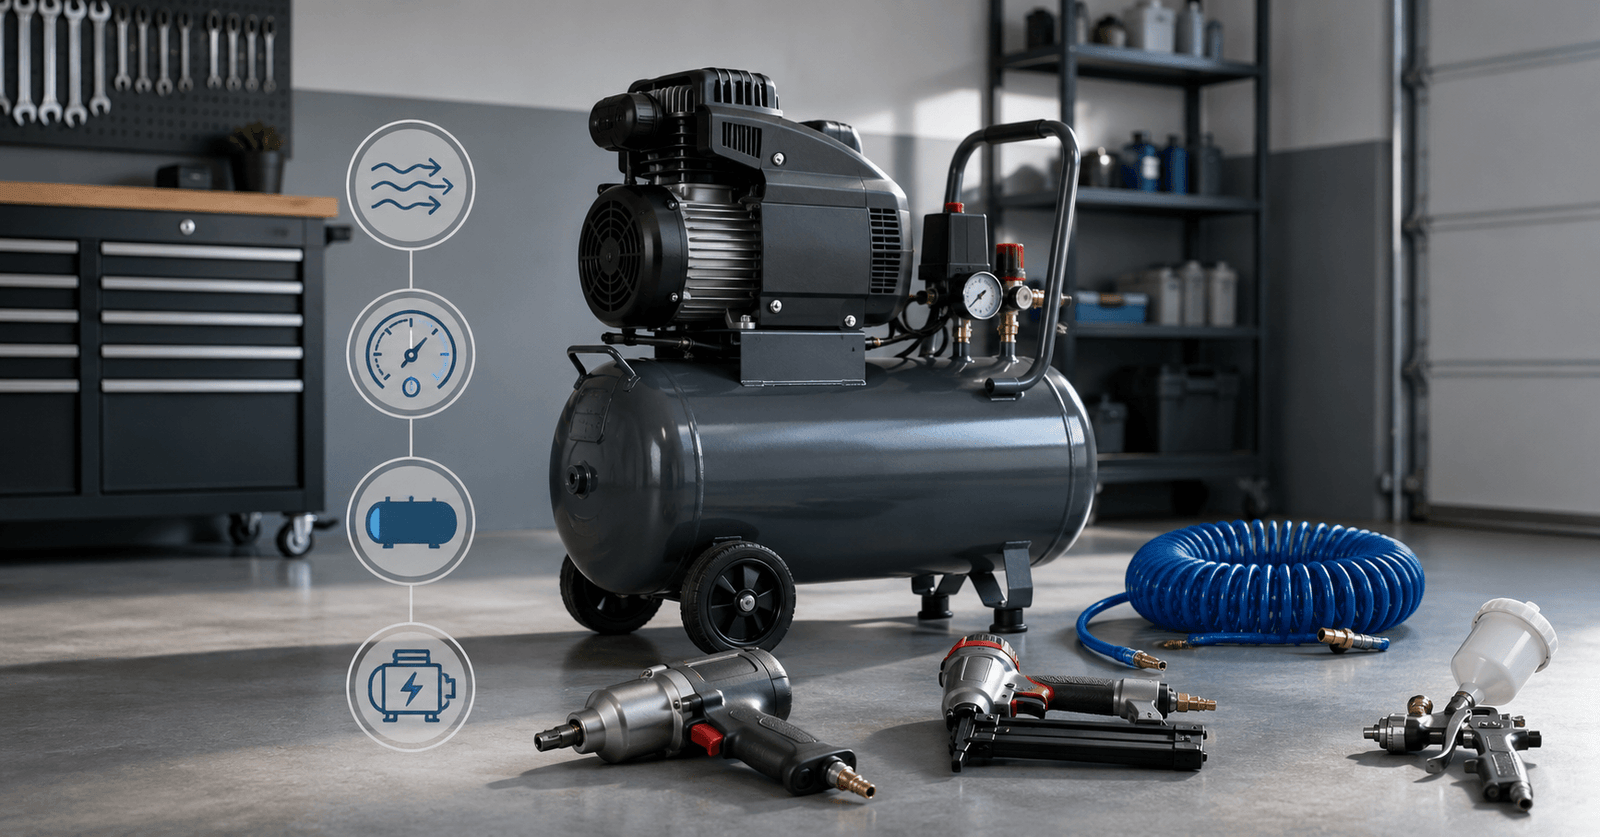
Air Compressor Size Guide
Choosing the right air compressor size sounds simple until you start seeing terms like CFM, SCFM, PSI, horsepower, duty cycle, tank capacity, single-stage, two-stage, oil-free, and 240V power. That is where most buyers get stuck.
The biggest mistake is buying based only on tank size or horsepower. A big tank does not automatically mean strong airflow. A high horsepower number does not always mean the compressor can keep up with demanding air tools. And a small portable compressor that looks convenient may run a nailer perfectly but struggle badly with a die grinder, sander, spray gun, or impact wrench.
The right air compressor size depends mainly on airflow demand, measured in CFM, and working pressure, measured in PSI. Tank size, horsepower, pump type, voltage, and duty cycle all matter too, but they support the real question: can the compressor deliver enough air at the pressure your tool needs?
This guide simplifies the whole process. You will learn how to size an air compressor for home garages, woodworking shops, automotive work, construction sites, paint spraying, pneumatic tools, and professional workshops without getting buried in confusing specs.
What Does Air Compressor Size Mean?
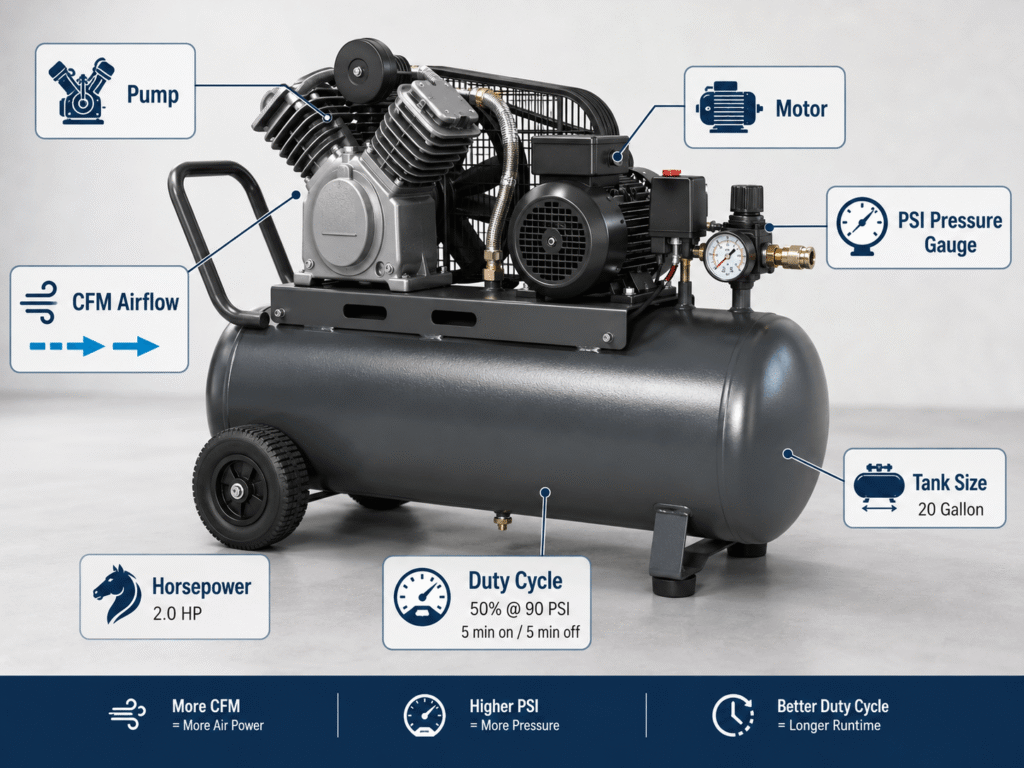
Air compressor size means the compressor’s ability to store, pressurize, and deliver compressed air for a specific task. It is not just the tank gallon rating. True compressor size depends on CFM, PSI, tank capacity, horsepower, pump output, duty cycle, motor power, and how continuously the tool uses air.
When people ask, “What size air compressor do I need?” they usually think about the tank: 6 gallon, 20 gallon, 60 gallon, or 80 gallon. Tank size matters, but it is only one part of the system.
A compressor’s real working capacity comes from how all these specs work together:
| Specification | What It Means | Why It Matters |
|---|---|---|
| Tank size | Amount of compressed air storage | Helps maintain pressure during short bursts |
| CFM / SCFM | Air volume delivered per minute | Determines whether tools keep running properly |
| PSI | Air pressure | Must match the tool’s operating pressure |
| Horsepower | Motor power | Supports pump output but should not be the main buying factor |
| Duty cycle | How long the compressor can run within a cycle | Critical for sanders, grinders, sprayers, and shop use |
| Pump capacity | Compressor’s ability to refill air | Affects recovery time and continuous performance |
| Motor size | Electrical power available to drive the pump | Must match your outlet, breaker, and voltage |
Think of an air compressor like a water system:
- PSI is the pressure pushing the air.
- CFM is the volume of air flowing.
- Tank size is the storage reservoir.
- Horsepower helps drive the pump.
- Duty cycle tells you how hard the compressor can work before it overheats or wears faster.
For light work like inflating tires or using a brad nailer, a small portable compressor is often enough. For continuous tools like sanders, grinders, spray guns, or plasma cutters, you need higher CFM, a larger tank, and a stronger duty cycle.
Expert tip: When comparing models, check the compressor’s delivered CFM at the required PSI, usually 90 PSI for air tools. Do not rely only on peak PSI or advertised horsepower.
Which Air Compressor Size Do You Need?
You need an air compressor that delivers more CFM than your most demanding tool requires at the correct PSI. For most buyers, that means choosing by tool demand first, then matching tank size, horsepower, voltage, and duty cycle. Light tools need small compressors; continuous-use tools need larger shop compressors.
Your ideal compressor size depends on six practical questions:
- Which air tools will you use?
- What is the highest CFM requirement?
- What PSI does the tool need?
- Will the tool run continuously or in short bursts?
- Will one person or multiple users need air at the same time?
- Will you add bigger tools later?
Here is the simple rule:
Choose a compressor that delivers at least 25–40% more CFM than your highest-demand tool.
For example, if your impact wrench needs 5 CFM at 90 PSI, choose a compressor that delivers at least:
5 CFM × 1.3 = 6.5 CFM
That extra headroom helps prevent pressure drop, slow recovery, overheating, and constant cycling.
Quick Size Recommendations
| Use Case | Minimum Practical Compressor |
|---|---|
| Tire inflation only | 1–3 gallon portable compressor or inflator |
| Brad nailer / finish nailer | 2–6 gallon compressor |
| DIY garage work | 6–20 gallon compressor |
| Light automotive work | 20–30 gallon compressor |
| Impact wrench use | 20–60 gallon compressor depending on CFM |
| Painting / spray gun | 30–80 gallon compressor depending on gun type |
| Sanding / grinding | 60–80 gallon compressor or rotary screw unit |
| Professional shop | 60–120 gallon stationary compressor |
| Industrial continuous use | Rotary screw or two-stage compressor system |
If you are a beginner, do not overbuy blindly. A huge 80-gallon stationary compressor is overkill for inflating tires and running a nailer. But do not underbuy either. A 6-gallon pancake compressor may run a nailer, but it will not comfortably support an air sander or HVLP sprayer.
Understanding CFM (Cubic Feet per Minute)
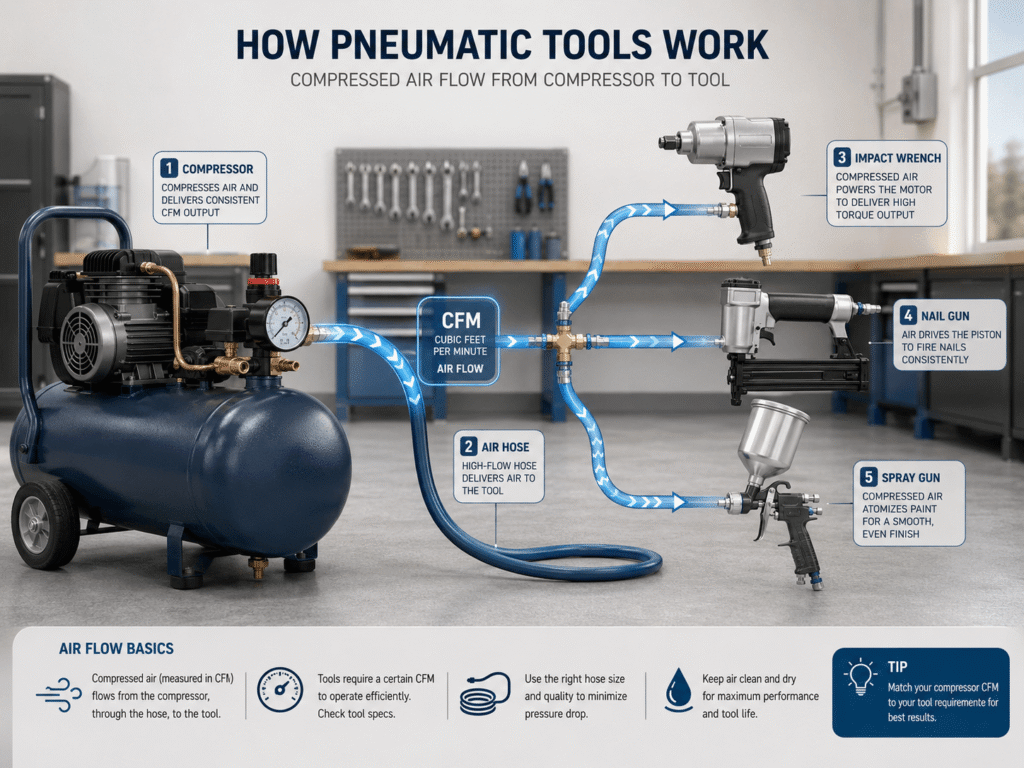
CFM measures how much air a compressor can deliver per minute. It is usually the most important air compressor sizing number because most pneumatic tools fail from lack of airflow, not lack of pressure. Always compare delivered CFM at the tool’s operating PSI, not inflated marketing numbers or displacement ratings.
CFM stands for cubic feet per minute. It tells you how much compressed air moves from the compressor to the tool in one minute.
Many tools operate around 90 PSI, so compressor ratings often list CFM at 90 PSI. That number is more useful than maximum PSI.
Delivered CFM vs Displacement CFM
There are two numbers buyers often confuse:
| Term | Meaning | Usefulness |
|---|---|---|
| Displacement CFM | Theoretical air moved by the pump | Less useful for buying |
| Delivered CFM / SCFM | Actual usable air output at a stated pressure | Most important buying number |
Delivered CFM is what matters because it reflects usable air at working pressure.
Why CFM Matters More Than Horsepower
Horsepower tells you motor power, not actual usable air delivery. Two compressors can both claim 2 HP, but one may deliver 4 CFM at 90 PSI while another delivers 6 CFM at 90 PSI.
For tool sizing, use this priority:
- Required CFM
- Required PSI
- Duty cycle
- Tank size
- Horsepower
- Voltage and power supply
How to Calculate Required CFM
Use this formula:
Required Compressor CFM = Highest Tool CFM × Safety Factor
For most users, use a safety factor of 1.25 to 1.40.
Example 1: Brad Nailer
A brad nailer needs about 0.5–1.0 CFM at 70–90 PSI.
Calculation:
1.0 CFM × 1.3 = 1.3 CFM
A small 2–6 gallon compressor is usually enough.
Example 2: Impact Wrench
A 1/2-inch impact wrench may need 4–6 CFM at 90 PSI.
Calculation:
6 CFM × 1.3 = 7.8 CFM
A 20-gallon compressor may work for short use, but a 30–60 gallon compressor is better for frequent automotive work.
Example 3: DA Sander
A dual-action sander may need 10–15 CFM at 90 PSI.
Calculation:
15 CFM × 1.3 = 19.5 CFM
That usually means a large stationary compressor, often 60–80 gallons or a rotary screw system for serious shop use.
CFM Headroom Guide
| Tool Usage | Recommended CFM Headroom |
|---|---|
| Occasional DIY | 25% extra |
| Weekend workshop | 30% extra |
| Automotive garage | 35% extra |
| Continuous sanding/grinding | 40%+ extra |
| Multiple users | Add all simultaneous CFM, then add 30–40% |
Expert tip: If the compressor runs nonstop and pressure keeps dropping, the tank is not the real problem. The compressor does not produce enough CFM for the tool.
Understanding PSI
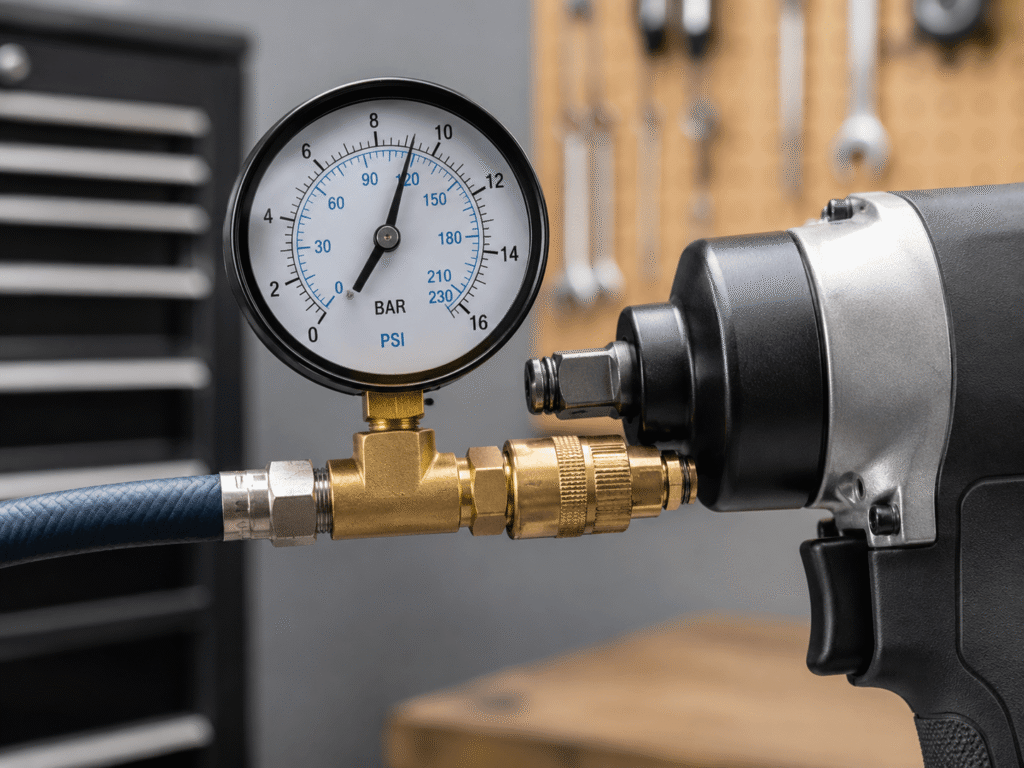
PSI measures air pressure, or the force that moves compressed air through the tool. Most pneumatic tools need 70–100 PSI, while some tire, industrial, and specialty tools need more. Higher PSI is not automatically better; the compressor must deliver the required airflow at the correct working pressure.
PSI stands for pounds per square inch. It tells you how much pressure is available in the air system.
There are three PSI numbers to understand:
| PSI Type | Meaning |
|---|---|
| Working PSI | Pressure your tool needs while operating |
| Maximum PSI | Highest pressure the compressor tank can store |
| Regulated PSI | Pressure adjusted at the outlet regulator |
Most common air tools run at about 90 PSI. Nailers often work between 70–120 PSI. Paint sprayers and HVLP guns often use lower pressure but require steady airflow.
Typical PSI Requirements
| Tool / Application | Typical PSI |
|---|---|
| Brad nailer | 70–90 PSI |
| Finish nailer | 70–100 PSI |
| Framing nailer | 90–120 PSI |
| Impact wrench | 90–100 PSI |
| Air ratchet | 90 PSI |
| Die grinder | 90 PSI |
| Spray gun | 30–50 PSI |
| HVLP sprayer | 20–40 PSI at the gun, higher supply pressure may be needed |
| Tire inflator | 90–150 PSI depending on tire |
| Blow gun | 30–90 PSI depending on safe use and application |
| Plasma cutter | 60–120 PSI depending on model |
Why Excessive PSI Is Unnecessary
A compressor with 175 PSI is not automatically better than one with 135 PSI if both deliver the same CFM at 90 PSI. Higher tank pressure can store more compressed air, but tools still need proper regulated pressure.
Too much pressure can cause:
- Poor tool control
- Faster tool wear
- Unsafe blow-off force
- Paint defects
- Damaged seals
- Increased air consumption
Expert tip: Set the regulator to the tool manufacturer’s recommended working PSI while the tool is running, not while the tool is idle. Pressure drops during use, and static readings can fool you.
Air Compressor Tank Size Guide
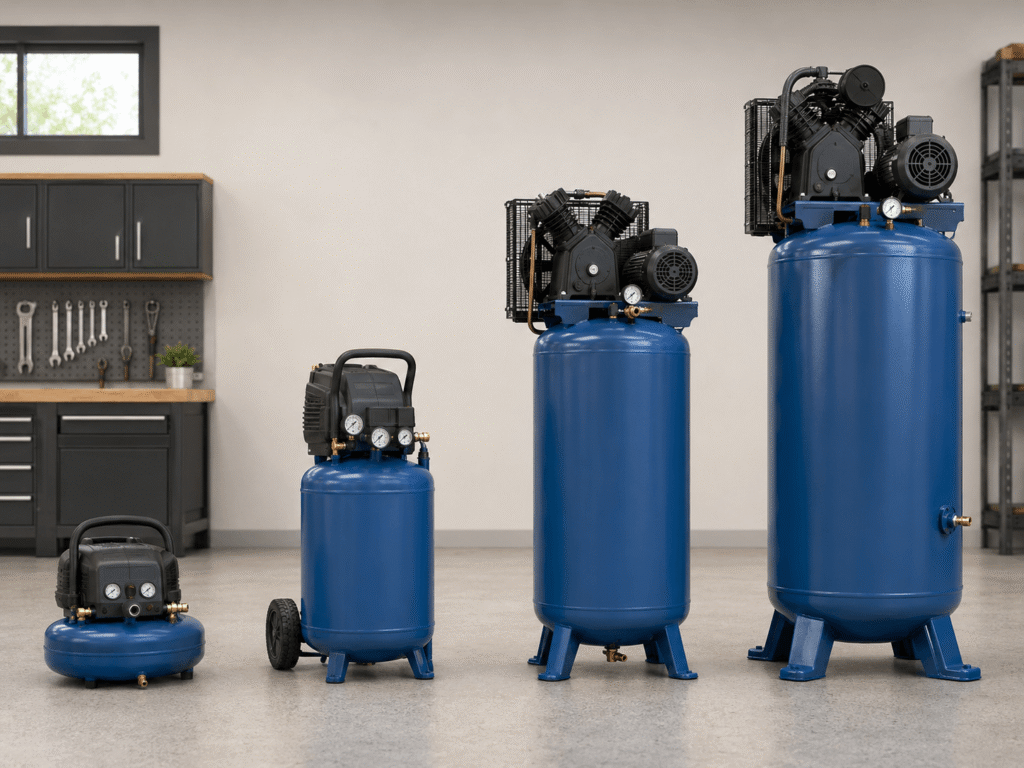
Air compressor tank size controls stored air volume, not actual airflow production. Small tanks are fine for quick bursts like nailers and inflating. Larger tanks help with longer tool run time, smoother pressure, and fewer motor cycles, but the compressor pump still needs enough CFM for the job.
A tank is an air storage reservoir. It helps the compressor handle short bursts of demand and reduces how often the motor cycles on and off.
But remember this:
A bigger tank does not increase compressor CFM. It only stores more air.
If your tool needs 12 CFM and the compressor only produces 5 CFM, a bigger tank will only delay the pressure drop. It will not solve the airflow shortage.
Air Compressor Tank Size Chart
| Tank Size | Best For | Typical Uses |
|---|---|---|
| 1–6 gallon | Inflating, brad nailers | Tires, sports balls, trim nailers, small blow-off jobs |
| 6–10 gallon | DIY | Finish nailers, small staplers, light garage tasks |
| 20 gallon | Home workshop | Tire inflation, small impact wrench jobs, light spraying |
| 30 gallon | Automotive | Impact wrench, ratchet, occasional painting, garage tools |
| 60 gallon | Professional shop | Spray guns, grinders, sanders, multiple air tools |
| 80 gallon | Industrial | Continuous-use tools, body shops, fabrication, production work |
Pros and Cons by Tank Size
1–6 Gallon Compressors
Advantages:
- Lightweight and portable
- Good for nailers and inflating
- Affordable
- Easy to store
Disadvantages:
- Poor for continuous tools
- Loud cycling on some models
- Limited airflow
- Not ideal for automotive repair beyond light tasks
20–30 Gallon Compressors
Advantages:
- Good balance for home garages
- Can run many intermittent air tools
- Better recovery than small compressors
- Often still movable
Disadvantages:
- May struggle with sanders and grinders
- Can be noisy
- Some require stronger electrical circuits
- Not ideal for continuous professional use
60–80 Gallon Compressors
Advantages:
- Better for shops and demanding tools
- More stable pressure
- Longer run time
- Better for spraying, sanding, and automotive work
Disadvantages:
- More expensive
- Requires more space
- Often needs 240V power
- Less portable
Expert recommendation: For a serious home garage, 20–30 gallons is a practical starting point. For professional automotive, painting, sanding, or daily shop work, 60 gallons or more is usually the safer choice.
Recommended Air Compressor Size by Tool
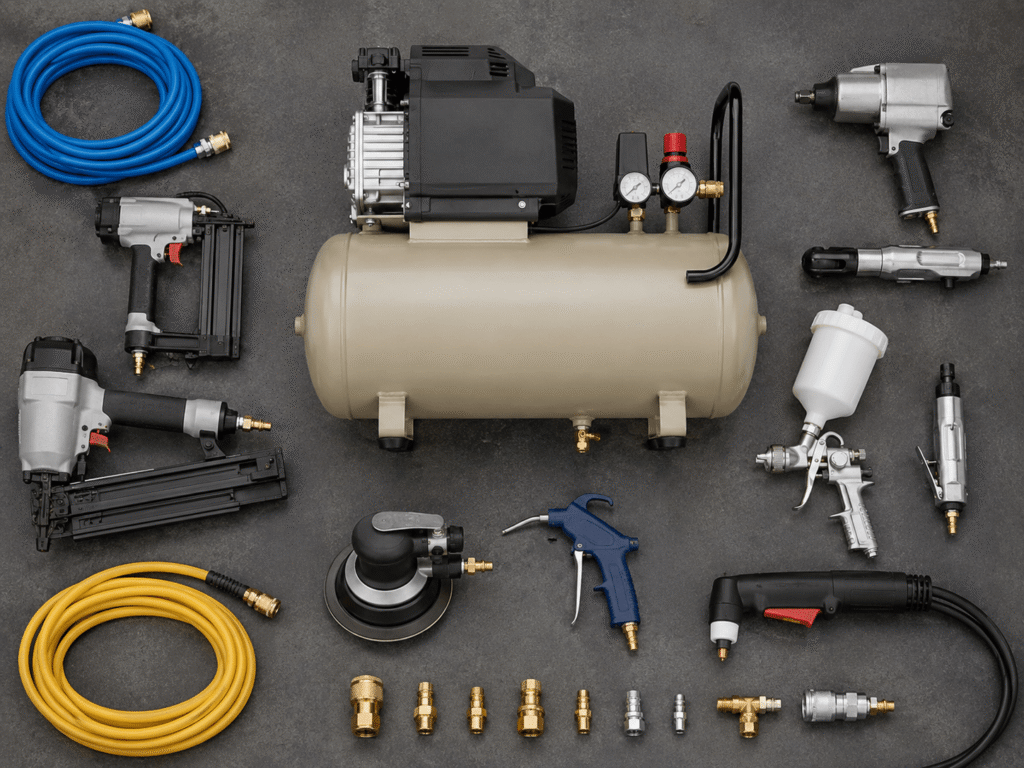
The right compressor depends on each tool’s required CFM and PSI. Nailers need little airflow, while sanders, grinders, spray guns, and plasma cutters need much more. Use the most demanding tool as your baseline, then add airflow headroom so the compressor does not run constantly or lose pressure.
The chart below gives practical starting points. Always check your tool’s manual because air demand varies by tool size, brand, nozzle, duty cycle, and usage style.
Air Tool CFM, PSI, Tank, and HP Chart
| Tool | Required PSI | Required CFM | Recommended Tank | Recommended HP |
|---|---|---|---|---|
| Finish nailer | 70–100 PSI | 0.5–2 CFM | 2–6 gallon | 0.5–1.5 HP |
| Brad nailer | 70–90 PSI | 0.3–1 CFM | 1–6 gallon | 0.5–1 HP |
| Framing nailer | 90–120 PSI | 2–4 CFM | 6–10 gallon | 1–2 HP |
| Impact wrench, 3/8 in. | 90 PSI | 3–4 CFM | 10–20 gallon | 1.5–2 HP |
| Impact wrench, 1/2 in. | 90 PSI | 4–6 CFM | 20–30 gallon | 2–3 HP |
| Impact wrench, 3/4 in. | 90–100 PSI | 7–12 CFM | 60 gallon | 3–5 HP |
| Air ratchet | 90 PSI | 3–5 CFM | 10–20 gallon | 1.5–2 HP |
| Paint sprayer | 30–50 PSI | 4–8 CFM | 30–60 gallon | 2–5 HP |
| HVLP sprayer | 20–40 PSI at gun | 8–15 CFM | 60–80 gallon | 3–5 HP |
| Air hammer | 90 PSI | 4–8 CFM | 20–30 gallon | 2–3 HP |
| Die grinder | 90 PSI | 5–8 CFM | 30–60 gallon | 2–5 HP |
| Cut-off tool | 90 PSI | 4–10 CFM | 30–60 gallon | 2–5 HP |
| Orbital sander | 90 PSI | 6–12 CFM | 60 gallon | 3–5 HP |
| DA sander | 90 PSI | 10–15 CFM | 60–80 gallon | 5 HP+ |
| Spray gun | 30–50 PSI | 4–12 CFM | 30–80 gallon | 3–5 HP |
| Tire inflator | 90–150 PSI | 1–3 CFM | 1–10 gallon | 0.5–2 HP |
| Blow gun | 30–90 PSI | 2–10 CFM | 6–30 gallon | 1–3 HP |
| Plasma cutter | 60–120 PSI | 4–8+ CFM | 30–60 gallon | 3–5 HP |
Practical Tool Sizing Notes
- Nailers: Need quick bursts of air, so small tanks work well.
- Impact wrenches: Work with mid-size compressors for short bursts, but frequent lug nut work needs more tank and CFM.
- Spray guns: Need steady airflow. Undersized compressors cause poor atomization and uneven finish.
- Sanders and grinders: These are air-hungry tools. Buy more CFM than you think.
- Plasma cutters: Require clean, dry, steady air. Add a dryer or filter system.
Expert tip: For continuous tools, do not size by “average CFM” alone. Look for continuous CFM demand and add headroom.
Air Compressor Size by User Type
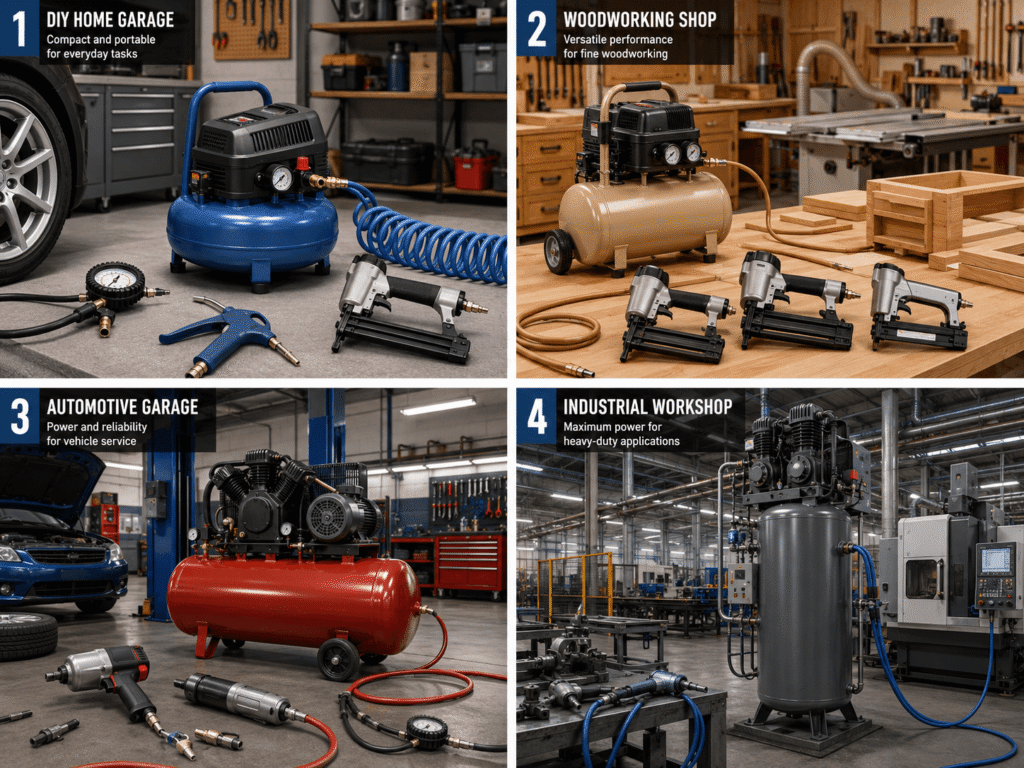
Different users need different compressor sizes because their tools, frequency, and duty cycle are different. A DIY homeowner can use a compact 6-gallon compressor, while an automotive shop may need a 60–80 gallon two-stage unit. Match the compressor to real work patterns, not wishful thinking.
DIY Homeowner
Recommended size: 1–6 gallon
Typical CFM: 0.5–3 CFM
Best for:
- Tire inflation
- Sports equipment
- Brad nailers
- Finish nailers
- Light cleaning
- Small household repairs
A 6-gallon pancake compressor is usually enough for basic home tasks. It is portable, affordable, and easy to store.
Weekend Hobbyist
Recommended size: 6–20 gallon
Typical CFM: 2–6 CFM
Best for:
- Trim work
- Small garage jobs
- Light automotive tasks
- Occasional impact wrench use
- Hobby spraying
This is the sweet spot for many users. A 20-gallon compressor gives more flexibility without jumping into full shop equipment.
Woodworking Shop
Recommended size: 6–30 gallon
Typical CFM: 2–8 CFM
Best for:
- Brad nailers
- Finish nailers
- Staplers
- Blow guns
- Light spray finishing
Woodworking usually uses short bursts unless you spray finishes regularly. For HVLP spraying, move toward 60 gallons or more.
Automotive Garage
Recommended size: 20–60 gallon
Typical CFM: 5–12 CFM
Best for:
- Impact wrenches
- Air ratchets
- Tire inflation
- Air hammers
- Die grinders
- Cut-off tools
For occasional car work, 20–30 gallons may be fine. For regular mechanic work, choose 60 gallons with strong CFM at 90 PSI.
Construction
Recommended size: 4–20 gallon portable
Typical CFM: 2–6 CFM
Best for:
- Framing nailers
- Roofing nailers
- Finish nailers
- Staplers
- Jobsite repairs
Construction needs portability more than huge tank capacity. Gas-powered or wheelbarrow-style compressors are useful where electricity is limited.
Professional Mechanic
Recommended size: 60–80 gallon
Typical CFM: 10–20+ CFM
Best for:
- Impact tools
- Grinders
- Sanders
- Air hammers
- Tire machines
- Multiple users
A professional mechanic should buy for airflow, recovery speed, and duty cycle. Undersized compressors waste time every day.
Industrial Shop
Recommended size: 80+ gallon, two-stage, or rotary screw system
Typical CFM: 20–100+ CFM
Best for:
- Production tools
- CNC equipment
- Pneumatic machinery
- Multiple workstations
- Continuous operation
Industrial sizing should include an air audit, leak control, air treatment, storage strategy, and future expansion planning.
Single-Stage vs Two-Stage Air Compressors
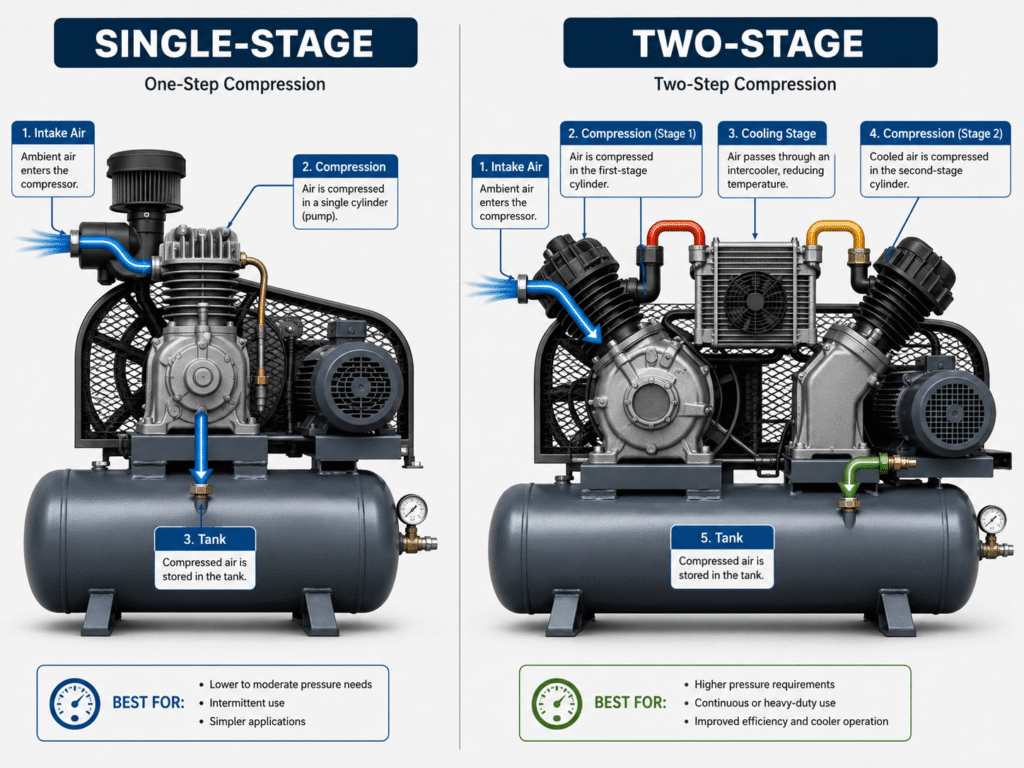
Single-stage compressors compress air once and are usually best for home, DIY, and light shop use. Two-stage compressors compress air twice, reach higher pressure, run more efficiently under heavy demand, and are better for professional garages, industrial shops, and continuous-use pneumatic equipment.
The difference is how the pump compresses air.
Single-Stage Compressor
A single-stage compressor pulls air into one cylinder and compresses it once before sending it to the tank.
Best for:
- Home garages
- DIY tools
- Nailers
- Tire inflation
- Light automotive work
- Small workshops
Two-Stage Compressor
A two-stage compressor compresses air in one cylinder, cools it, then compresses it again in a second cylinder.
Best for:
- Professional shops
- Automotive repair
- Spray painting
- Continuous air tools
- Industrial work
- Higher-pressure applications
Single-Stage vs Two-Stage Comparison
| Feature | Single-Stage | Two-Stage |
|---|---|---|
| Compression process | Air compressed once | Air compressed twice |
| Typical max pressure | Around 125–135 PSI | Around 175 PSI |
| Best for | DIY and light shop use | Professional and industrial use |
| Efficiency under load | Good for intermittent use | Better for heavy use |
| Cost | Lower | Higher |
| Maintenance | Simpler | More involved |
| Recommended tank | 6–60 gallon | 60–120 gallon |
| Ideal user | Homeowner, hobbyist | Mechanic, body shop, industrial user |
Expert recommendation: Choose single-stage for general home and light shop work. Choose two-stage when you need high pressure, high CFM, long duty cycles, or multiple users.
Portable vs Stationary Air Compressors
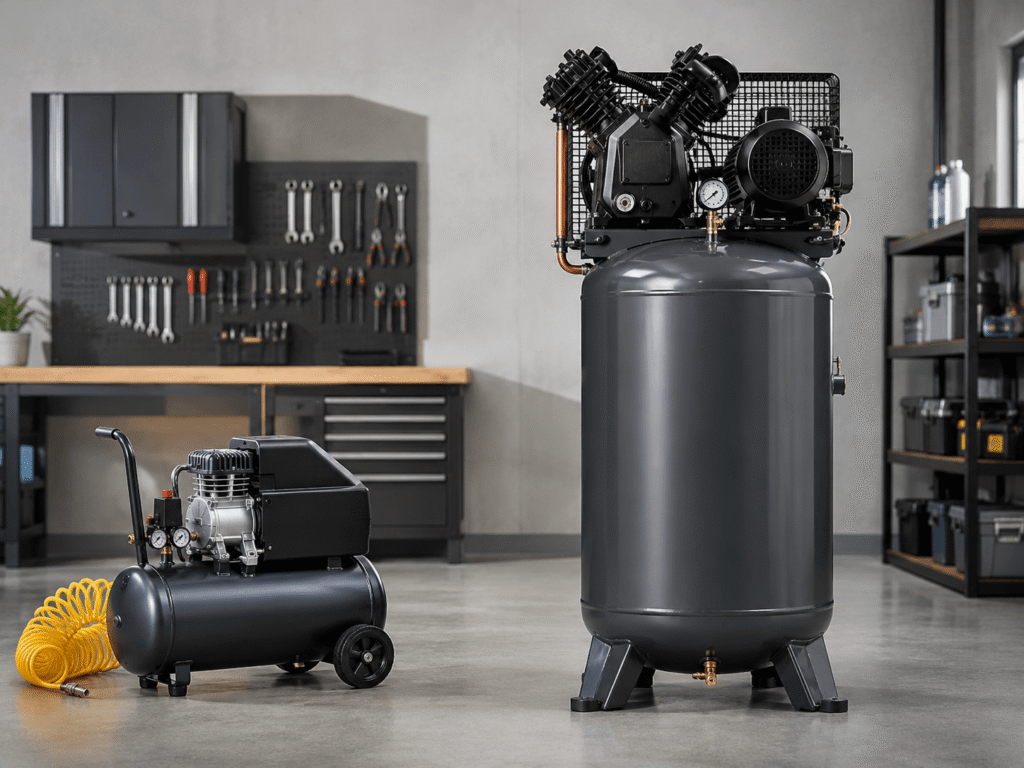
Portable compressors are best when mobility matters, while stationary compressors are best when airflow, tank capacity, and long-duty performance matter more. A portable compressor can run nailers and light tools, but a stationary compressor is usually the better choice for automotive, painting, grinding, sanding, and professional shop work.
Portable Air Compressors
Portable compressors include pancake, hot dog, twin-stack, and wheelbarrow-style units.
Best for:
- Jobsite work
- DIY projects
- Trim carpentry
- Roofing
- Framing
- Tire inflation
- Small garages
Pros:
- Easy to move
- Lower cost
- Smaller footprint
- Simple storage
- Good for nailers
Cons:
- Limited CFM
- Smaller tanks
- More frequent cycling
- Not ideal for continuous tools
- Often louder than expected
Stationary Air Compressors
Stationary compressors are larger units installed in a garage, shop, or industrial facility.
Best for:
- Automotive shops
- Paint booths
- Woodworking shops
- Metal fabrication
- Industrial equipment
- Multiple users
Pros:
- Higher CFM
- Larger tanks
- Better recovery
- Longer service life
- Handles demanding tools
Cons:
- Higher cost
- Needs more space
- May require 240V or three-phase power
- Not easy to move
Portable vs Stationary Comparison
| Factor | Portable Compressor | Stationary Compressor |
|---|---|---|
| Mobility | Excellent | Poor |
| Capacity | Low to medium | Medium to high |
| Power | Usually lower | Higher |
| Noise | Varies, often noticeable | Varies, can be isolated |
| Maintenance | Simple | More involved |
| Ideal users | DIYers, contractors | Garages, shops, industry |
Expert tip: If the compressor never leaves your garage, do not overvalue portability. A stationary unit with better CFM may serve you much better long term.
Air Compressor Voltage and Power Requirements
Air compressor power requirements matter because larger compressors may need 240V or three-phase power. Small units usually run on 120V outlets, but higher-CFM shop compressors often require dedicated circuits. Always match the compressor to your electrical supply, breaker size, extension cord limits, and generator capacity.
Electrical compatibility is one of the most overlooked sizing issues.
120V Air Compressors
Best for:
- Small portable compressors
- DIY use
- Nailers
- Tire inflation
- Light garage work
Most 120V compressors plug into standard household outlets. However, they have limited motor power and CFM output.
240V Air Compressors
Best for:
- 30–80 gallon shop compressors
- Automotive garages
- Spray painting
- Higher CFM tools
- Professional workshops
A 240V compressor usually requires a dedicated circuit. This is common for 60-gallon shop compressors.
Three-Phase Air Compressors
Best for:
- Industrial facilities
- Manufacturing
- Rotary screw compressors
- High-CFM systems
- Multiple workstations
Three-phase power is usually not available in homes. It is common in industrial and commercial buildings.
Extension Cord Warning
Avoid long, undersized extension cords. They cause voltage drop, hard starting, overheating, and motor damage.
Better options:
- Use a shorter heavy-gauge cord if allowed by the manufacturer.
- Use a longer air hose instead of a long extension cord.
- Plug directly into a dedicated outlet when possible.
Generator Compatibility
If you run a compressor from a generator, account for starting watts, not just running watts. Compressor motors draw extra power at startup.
Expert tip: If the lights dim when your compressor starts, your circuit may be under stress. Check the manual and use a properly rated circuit.
Oil-Lubricated vs Oil-Free Compressors
Oil-free compressors are convenient, cleaner, and lower maintenance, making them useful for DIY, indoor work, and portability. Oil-lubricated compressors usually last longer, run cooler, handle heavier workloads better, and are preferred for professional garages, industrial use, and high-duty applications where durability matters.
Oil-Free Compressors
Oil-free compressors use coated components instead of an oil bath.
Best for:
- Home use
- Indoor projects
- Trim carpentry
- Portable jobs
- Occasional use
- Cleaner air applications
Advantages:
- Low maintenance
- No oil changes
- Lighter weight
- Cleaner operation
- Easier cold-weather starting
Disadvantages:
- Shorter lifespan under heavy use
- Can be noisy
- Less ideal for continuous demand
- More heat under hard cycles
Oil-Lubricated Compressors
Oil-lubricated compressors use oil to reduce friction and heat inside the pump.
Best for:
- Automotive work
- Professional shops
- Heavy-duty use
- Sanding and grinding
- Long compressor life
- High-duty cycles
Advantages:
- Better durability
- Cooler operation
- Longer pump life
- Better for demanding tools
- Often smoother and quieter at larger sizes
Disadvantages:
- Requires oil checks and changes
- Heavier
- May introduce oil vapor without filtration
- More maintenance
Oil-Free vs Oil-Lubricated Comparison
| Factor | Oil-Free | Oil-Lubricated |
|---|---|---|
| Maintenance | Lower | Higher |
| Lifespan | Good for light use | Better for heavy use |
| Noise | Often louder in small units | Often smoother in shop units |
| Durability | Moderate | Higher |
| Air cleanliness | Cleaner by default | Needs filtration for clean air |
| Best applications | DIY, nailers, indoor jobs | Automotive, shops, continuous tools |
Expert recommendation: Choose oil-free for convenience and light work. Choose oil-lubricated if you care more about durability, long run time, and demanding tool performance.
Common Air Compressor Sizing Mistakes
The most common air compressor sizing mistakes are buying by tank size, ignoring CFM, overlooking duty cycle, and choosing a compressor that barely meets today’s tool requirements. A correctly sized compressor should deliver enough airflow, pressure, storage, and recovery capacity for both current tools and realistic future upgrades.
Avoid these mistakes before you buy.
1. Buying Only by Tank Size
A 60-gallon tank with poor CFM output can still disappoint. Tank capacity helps storage, but the pump must produce enough air.
2. Ignoring CFM
This is the biggest mistake. If your tool needs 10 CFM and your compressor delivers 4 CFM, the tool will slow down no matter how high the tank PSI is.
3. Confusing PSI With Power
A compressor may reach 150 PSI but still have low airflow. PSI is pressure; CFM is volume.
4. Overlooking Duty Cycle
A compressor with a low duty cycle may not survive continuous sanding, grinding, or painting. For hard shop use, duty cycle matters as much as tank size.
5. Buying an Undersized Compressor
Undersized compressors cause:
- Long recovery times
- Pressure drop
- Poor tool performance
- Excess heat
- Shorter compressor life
- Frustrating work delays
6. Ignoring Future Tools
If you plan to add a spray gun, die grinder, plasma cutter, or DA sander later, size for that now. Buying twice is the expensive route.
7. Ignoring Power Supply
A great 60-gallon compressor is useless if your shop does not have the right 240V circuit.
8. Forgetting Air Quality
Painting, plasma cutting, and precision tools may need filters, dryers, regulators, and clean hoses. Compressor size alone does not guarantee clean air.
Expert tip: Before buying, write down the highest CFM tool you realistically plan to own in the next two years. Size for that tool, not just the tool you own today.
Step-by-Step Air Compressor Size Calculator
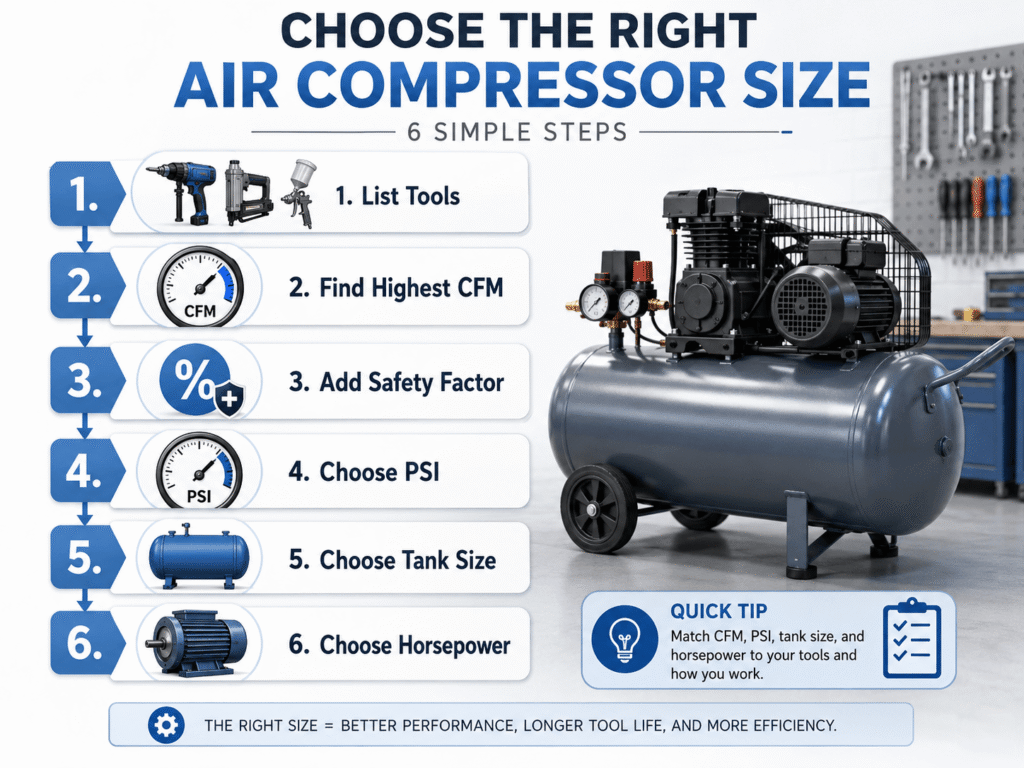
To size an air compressor correctly, list your tools, find the highest CFM requirement, add a safety factor, confirm PSI, choose the right tank size, then match horsepower and voltage. This simple calculator-style method prevents underbuying and helps you choose a compressor that performs reliably in real use.
Use this step-by-step framework.
Step 1: List Your Tools
Write down every air tool you plan to use.
Example:
- Brad nailer
- Framing nailer
- 1/2-inch impact wrench
- Air ratchet
- Die grinder
- Spray gun
Step 2: Find the Highest CFM Requirement
Check each tool’s manual or specification plate.
Example:
| Tool | CFM Needed |
|---|---|
| Brad nailer | 1 CFM |
| Framing nailer | 3 CFM |
| Impact wrench | 5 CFM |
| Air ratchet | 4 CFM |
| Die grinder | 7 CFM |
Highest tool demand: 7 CFM
Step 3: Multiply by Safety Factor
Use 1.25–1.40.
For a die grinder:
7 CFM × 1.35 = 9.45 CFM
Recommended compressor output: about 9.5–10 CFM at 90 PSI
Step 4: Choose PSI
Use the highest required tool pressure.
Example:
- Most tools need 90 PSI.
- Framing nailer may need up to 120 PSI.
- Tire inflation may need up to 150 PSI.
Choose a compressor with enough max PSI and a good regulator.
Step 5: Choose Tank Size
Use the tool type:
| Work Type | Tank Recommendation |
|---|---|
| Nailing and inflation | 1–10 gallon |
| Light garage tools | 20 gallon |
| Automotive work | 30–60 gallon |
| Painting and spraying | 30–80 gallon |
| Sanding and grinding | 60–80 gallon |
| Multiple users | 80+ gallon or system design |
Step 6: Choose Horsepower
Horsepower should support the required CFM, but do not use HP as the main sizing number.
General guide:
| Compressor Output | Typical HP Range |
|---|---|
| 1–3 CFM | 0.5–1.5 HP |
| 4–6 CFM | 1.5–2 HP |
| 7–10 CFM | 2–3 HP |
| 10–15 CFM | 3–5 HP |
| 15+ CFM | 5 HP+ |
Example: Home Garage Compressor
Tools:
- Tire inflator: 2 CFM
- Impact wrench: 5 CFM
- Air ratchet: 4 CFM
Highest CFM: 5 CFM
Safety factor:
5 × 1.3 = 6.5 CFM
Recommended compressor:
- 6.5+ CFM at 90 PSI
- 20–30 gallon tank
- 2–3 HP
- 120V high-output or 240V preferred
Example: Body Shop Compressor
Tools:
- HVLP spray gun: 12 CFM
- DA sander: 15 CFM
- Blow gun: 6 CFM
Highest CFM: 15 CFM
Safety factor:
15 × 1.4 = 21 CFM
Recommended compressor:
- 21+ CFM at 90 PSI
- 60–80 gallon tank minimum
- 5 HP+
- 240V or commercial power
- Moisture filtration and air dryer
Air Compressor Maintenance Tips
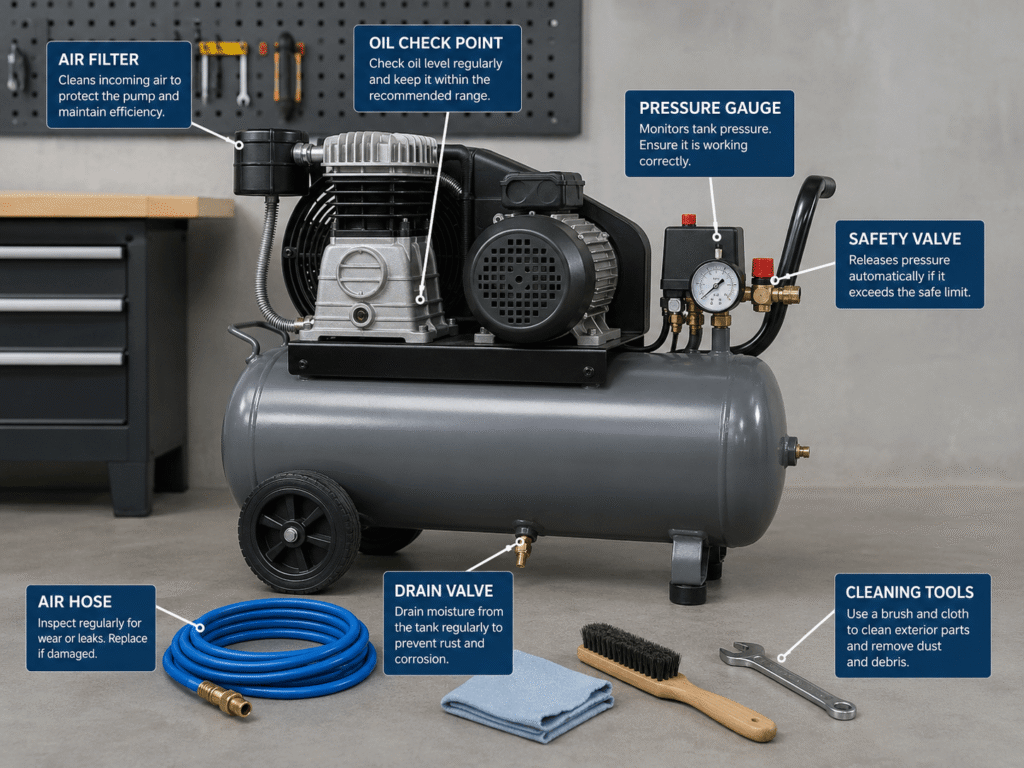
A properly sized compressor still needs maintenance to deliver safe, dry, and reliable air. Drain moisture, check oil, replace filters, inspect hoses, clean intake vents, test the safety valve, and monitor the pressure switch. Good maintenance improves tool performance, reduces corrosion, and extends compressor life.
1. Drain Moisture From the Tank
Compressed air creates condensation. Drain the tank regularly, especially after heavy use.
Moisture inside the tank can cause:
- Rust
- Reduced tank life
- Water in air lines
- Paint defects
- Tool damage
2. Replace or Clean Air Filters
A dirty intake filter makes the compressor work harder. Clean or replace it based on the manual.
3. Check Oil Level
For oil-lubricated compressors, check pump oil before use. Low oil can destroy the pump.
4. Inspect Hoses and Fittings
Look for:
- Cracks
- Leaks
- Loose couplers
- Damaged threads
- Kinks
- Weak clamps
Air leaks waste compressor output and reduce tool performance.
5. Clean Intake Areas
Keep the motor and pump area free from dust, sawdust, and debris. Heat is the enemy of compressor life.
6. Test the Safety Valve
The pressure relief valve protects the tank from overpressure. Test it carefully according to the manual.
7. Check the Pressure Switch
If the compressor does not shut off or starts too often, the pressure switch may need inspection.
8. Use Proper Air Treatment
For painting, plasma cutting, and precision tools, use:
- Water separator
- Regulator
- Coalescing filter
- Desiccant dryer or refrigerated dryer when needed
- Clean dedicated hose
Expert tip: For shop compressors, add a maintenance log. Write down drain dates, oil changes, filter replacements, and any pressure problems.
Expert Buying Tips
The smartest air compressor buyers choose by delivered CFM at working PSI, not tank size or horsepower marketing. Allow 25–40% airflow headroom, match the compressor to the most demanding tool, consider future upgrades, check duty cycle, and make sure your power supply can support the compressor.
Use these tips before spending money.
Buy for CFM, Not HP Marketing
Horsepower claims can be misleading. Delivered CFM at 90 PSI is usually more useful.
Allow 25–40% Airflow Headroom
Headroom helps with:
- Pressure stability
- Recovery speed
- Longer pump life
- Better tool performance
- Future tool upgrades
Match the Compressor to the Most Demanding Tool
Do not size around your easiest tool. Size around your hardest tool.
Example:
- Brad nailer: 1 CFM
- Die grinder: 7 CFM
Buy for the die grinder.
Consider Future Expansion
If you plan to add automotive tools, paint equipment, or sanders, buy extra capacity now.
Prefer Quiet Models for Indoor Workshops
Noise matters more than people expect. A loud compressor in a small garage gets annoying fast.
Look for:
- Lower decibel ratings
- Slower RPM pumps
- Belt-drive designs
- Better vibration isolation
- Remote placement options
Evaluate Duty Cycle
For intermittent nailing, duty cycle is less critical. For sanding, grinding, spraying, or production work, duty cycle is essential.
Check Recovery Time
Fast recovery means less waiting between tool use. This matters in automotive and production environments.
Do Not Ignore Air Hose Size
A restrictive hose can starve the tool even when the compressor is large enough. High-CFM tools often need 3/8-inch hose instead of 1/4-inch hose.
Plan for Air Quality
For spray painting, do not stop at compressor size. You also need dry, clean, regulated air.
Quick Decision Checklist
Before buying, confirm:
- Required CFM at PSI
- Highest-demand tool
- Tank size
- Duty cycle
- Voltage and breaker
- Noise level
- Portability needs
- Oil-free or oil-lubricated design
- Air filtration needs
- Future tool upgrades
Frequently Asked Questions
Air compressor FAQs usually come down to one thing: match the compressor’s delivered CFM and PSI to the tool. Tank size, horsepower, and maximum pressure matter, but they cannot replace airflow. If a compressor cannot sustain the required CFM, the tool will slow down, stall, or perform inconsistently.
What size air compressor do I need?
You need a compressor that delivers at least 25–40% more CFM than your highest-demand air tool at the required PSI. For light home use, 1–6 gallons may work. For garage tools, consider 20–30 gallons. For sanding, painting, or professional work, choose 60 gallons or more.
Is a 6-gallon compressor enough?
A 6-gallon compressor is enough for tire inflation, brad nailers, finish nailers, staplers, and light DIY tasks. It is not ideal for impact wrenches, spray guns, sanders, grinders, or continuous-use tools because it usually lacks the required CFM and tank reserve.
Is a 20-gallon compressor sufficient for impact wrenches?
A 20-gallon compressor can run some 3/8-inch and 1/2-inch impact wrenches for short bursts if it delivers enough CFM at 90 PSI. For frequent automotive work, stuck bolts, or larger impacts, a 30–60 gallon compressor with stronger CFM is better.
What CFM should I buy?
Buy based on your most demanding tool. Nailers may need 1–4 CFM, impact wrenches often need 4–8 CFM, paint sprayers may need 4–12 CFM, and DA sanders can need 10–15 CFM. Add 25–40% extra CFM for better performance.
Does a bigger tank increase airflow?
No. A bigger tank stores more compressed air, but it does not increase pump output. If the compressor pump produces only 5 CFM, the system cannot continuously supply a 10 CFM tool. A larger tank only delays pressure drop.
Can one compressor run two tools?
Yes, if the compressor can supply the combined CFM of both tools at the required PSI. Add the CFM of tools used at the same time, then add 30–40% headroom. For two professional users, a large stationary compressor is usually required.
Is higher PSI better?
Higher PSI is only better if your tool requires it or if the compressor uses higher storage pressure effectively. Most tools still run around 90 PSI. CFM at working pressure is usually more important than maximum PSI.
How much horsepower do I need?
For light tools, 0.5–2 HP may be enough. For home garage tools, 2–3 HP is common. For professional shop compressors, 5 HP or more may be needed. Always verify CFM output instead of buying by horsepower alone.
Which compressor is best for painting?
For small spray jobs, a 30-gallon compressor with 6–8 CFM may work. For HVLP spraying, automotive painting, or professional finishes, choose a 60–80 gallon compressor with enough steady CFM, plus moisture filtration and clean air lines.
Which compressor is best for automotive work?
For light automotive work, a 20–30 gallon compressor can handle tire inflation, ratchets, and occasional impact wrench use. For professional mechanic work, choose a 60–80 gallon oil-lubricated compressor with strong CFM at 90 PSI and a suitable duty cycle.
Conclusion
Choosing the right air compressor size depends primarily on CFM, then PSI, tank size, horsepower, duty cycle, and power supply. A slightly larger compressor usually gives better long-term value because it runs cooler, recovers faster, supports more tools, and leaves room for future upgrades.
The simple rule is this: buy the compressor that can supply your most demanding tool, not your easiest tool.
For basic home use, a small portable compressor may be perfect. For a serious garage, 20–30 gallons is a better starting point. For professional automotive, painting, sanding, or continuous-use tools, move toward a 60–80 gallon stationary compressor or a properly designed compressed air system.
Before you buy, compare your tool’s required CFM and PSI, add 25–40% headroom, check your power supply, and think about the tools you may add later.
