


Automotive pullers are the go-to tools for removing bearings, gears, pulleys, and other press-fit components without destruction. Whether you're a shop mechanic pulling a seized wheel bearing or a weekend wrench extracting a harmonic balancer, choosing the right puller makes the difference between a five-minute job and a stripped part. Per OSHA hand tool safety guidelines, proper tool selection prevents injury and damage during extraction tasks.
The market offers mechanical jaw pullers, hydraulic kits, slide hammers, and specialty extractors, each built for different loads and clearances. Manufacturer specifications indicate that a standard 2-ton mechanical puller handles most passenger-car bearing jobs, while heavy-duty applications require 5 to 20 tons of force. Let's break down which puller fits your situation and how to use it safely.
Quick Answer
Automotive pullers remove bearings, gears, and pulleys safely. Mechanical pullers handle up to 5 tons of force. Hydraulic pullers provide higher force with less effort.
Choose based on job type, clearance, and component condition.
Which Automotive Puller Do You Actually Need? (And How to Pick It)
Picking the right puller starts with answering three questions before you buy anything. First, what are you pulling? A wheel bearing requires a different setup than a transmission gear or a harmonic balancer.
Second, how much clearance do you have around the component? Tight spaces often eliminate certain puller types outright. Third, how seized or stuck is the part?
Rust and heat cycling change everything about which tool will actually work.
Here's how those variables map to the right choice:
- If you're pulling light bearings with good clearance, a basic 2-jaw or 3-jaw mechanical puller costs under $40 and gets the job done.
- If you need more pulling power or your jaws can't reach around the part, a hydraulic puller kit gives you force without arm strength.
- If you're working in tight quarters where jaw placement is impossible, a slide hammer with appropriate adapters becomes the practical pick.
- If the component is deeply seized, combining penetrating oil with a hydraulic system or thermal expansion improves success rates significantly.
The most common mistake builders and technicians make is grabbing the biggest puller they can find. Oversized tools don't solve small problems better. They often cannot fit in the available space and apply uneven force that cracks housings.
Start by measuring the shaft diameter, the bore you need to clear, and the physical space around the part. Those three measurements narrow your options faster than any shopping list.
Budget matters too. A quality 3-jaw mechanical puller set from a reputable brand runs $50 to $120 and covers most home garage work. Hydraulic kits start around $80 and scale up to $400 depending on tonnage.
Specialty pullers like harmonic balancer extractors run $30 to $200 each but are purpose-built for specific applications. Spending moderately upfront on the right tool saves money on damaged parts and failed attempts.
Mechanical Pullers: 2-Jaw vs. 3-Jaw — What's the Real Difference?
Mechanical pullers dominate the automotive repair world because they are simple, affordable, and effective for the majority of everyday jobs. The two main variants are 2-jaw and 3-jaw designs, and understanding their differences helps you avoid costly mistakes in the shop.
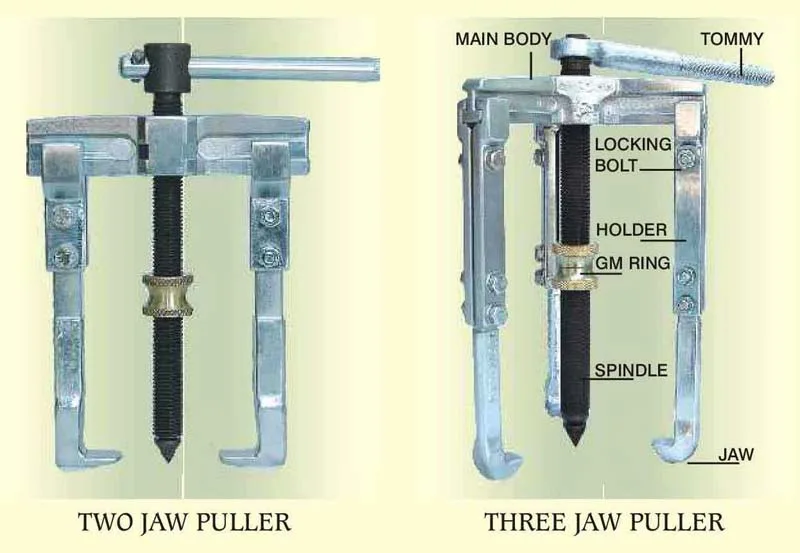
A 2-jaw puller uses two opposing arms that grip the component and a central screw that drives against the shaft. They are lighter, cheaper, and better suited for asymmetrical shapes or limited clearance situations. The downside is that 2-jaw pullers can apply uneven force if the jaws are not perfectly aligned.
This misalignment warps thin housings or slips off smooth bearing races during removal.
A 3-jaw puller distributes force evenly around the component because all three arms pull simultaneously. This balanced design reduces the risk of tilting or binding. It is the preferred choice for round bearings, sprockets, and pulleys where concentric force matters.
The trade-off is that 3-jaw models require more radial clearance around the part to position the jaws properly.
When deciding between the two, consider these practical factors:
- Clearance: If you can slide all three jaws under the part, the 3-jaw design provides safer, more centered pulling. Limited clearance pushes you toward a 2-jaw model or a slide hammer.
- Component shape: Round bearings and symmetrical parts benefit from 3-jaw evenness. Irregular shapes or components with obstructions may only accept a 2-jaw arrangement.
- Force requirements: For typical automotive bearings under 2 tons, either design works. Above that threshold, look for heavy-duty 3-jaw sets with larger screws and reinforced arms.
- Price: 2-jaw pullers often cost 20 to 30 percent less than comparable 3-jaw sets. Budget-conscious buyers can start with a 2-jaw and add a 3-jaw later.
Both types share the same basic operation. Position the jaws under the component evenly. Engage the center screw against the shaft end.
Turn gradually while checking alignment frequently. Stop immediately if the puller begins to tilt or bind. Slow, steady torque beats sudden force every time.
Quality materials matter more than brand names. Look for carbon steel or chrome vanadium construction with hardened threads. Replaceable jaws extend tool life when wear sets in.
Cheap stamped-steel pullers from unknown manufacturers often strip threads or bend arms under moderate load. Investing $60 to $100 in a branded set pays for itself after one successful removal.
Hydraulic & Specialty Pullers: When to Upgrade Your Game
Mechanical pullers handle most daily tasks, but certain jobs exceed their capacity or geometry. Hydraulic pullers and specialty extractors exist for those moments when brute mechanical advantage or unique adapter configurations become necessary. Knowing when to upgrade prevents frustration and protects expensive components.
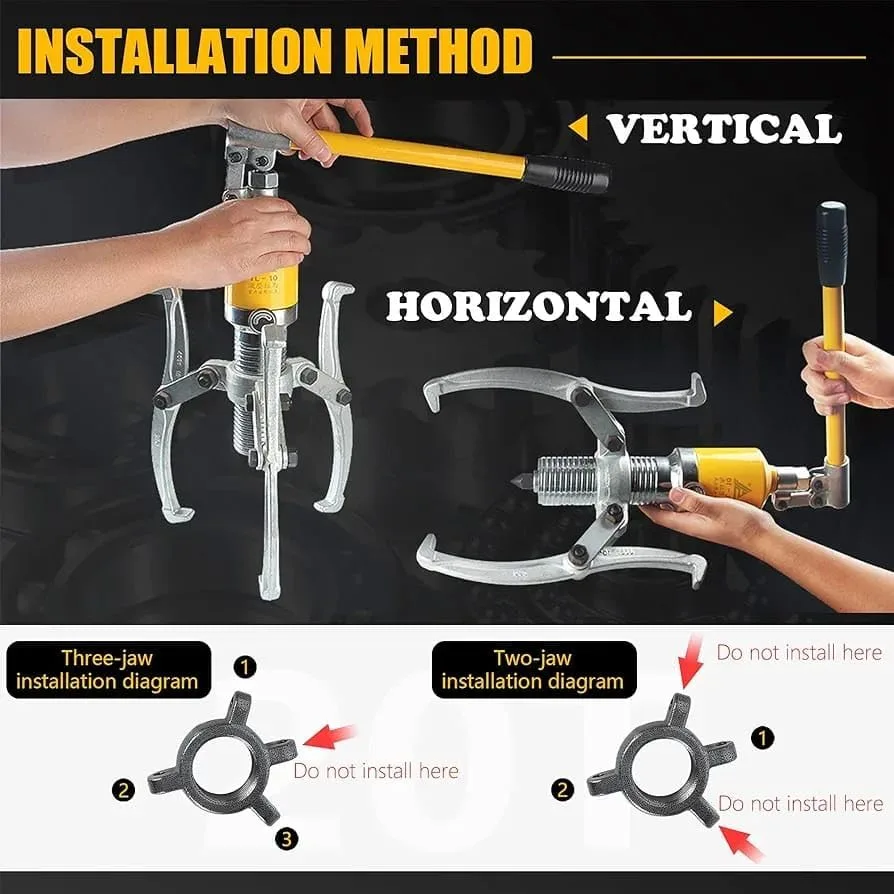
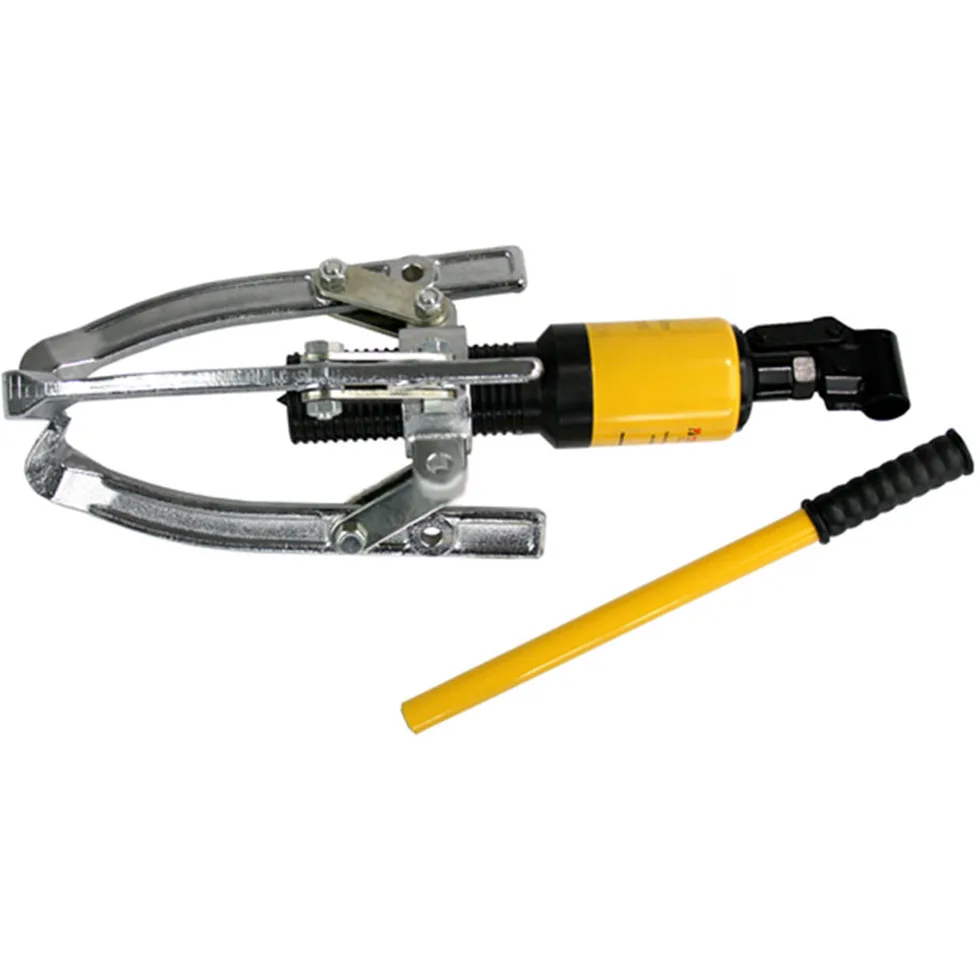
Hydraulic pullers replace hand torque with fluid pressure to generate consistent, high force. A typical 5-ton hydraulic puller kit produces pulling force equivalent to several hundred pounds of manual screw torque. The operator pumps a handle rather than wrestling with a long bar.
This matters enormously when dealing with rusted suspension components, pressed-in transmission bearings, or seized differential gears.
The core advantages of hydraulic systems include:
- Consistent force delivery without arm fatigue or slip
- Higher tonnage options ranging from 2 tons to over 20 tons in single-unit kits
- Compact designs that fit into spaces where long mechanical arms cannot swing
- Quick release valves that let you back off tension safely instead of lowering a loaded mechanical screw
Hydraulic pullers also integrate accessories like spreader bars, removable jaws, and cup attachments. These expand what a single kit can tackle without buying separate tools. A mechanic working on heavy equipment or domestic trucks benefits most from this versatility.
Specialty pullers fill gaps that general-purpose designs cannot address. Harmonic balancer pullers thread directly into the crankshaft snout and push against the balancer face without damaging timing marks or threading. Ball joint separators apply controlled spread force to pop tapered joints loose without hammering the steering knuckle.
Tie rod end pullers feature crescent-shaped jaws that wrap around the stud while pressing against the knuckle. U-joint pickers use pointed fingers to extract pressed-in pins from cross assemblies.
Each specialty tool targets a specific failure mode. Buying them individually adds up quickly. Many automotive aftermarket brands sell bundled kits that include a base hydraulic pump plus multiple adapter configurations for under $200.
These bundles serve home mechanics better than purchasing single-purpose tools throughout the year.
The main drawbacks of hydraulic systems involve maintenance and cost. Hydraulic fluid leaks degrade performance over time. Seals dry out if the unit sits unused for extended periods.
Initial investment runs 2 to 4 times higher than mechanical equivalents. However, for professionals pulling seized components daily, the time savings and reduced part damage justify the expense completely.
Head-to-Head: Every Puller Type Compared
Comparing puller types side by side reveals which tool wins under specific conditions. No single puller handles every automotive removal job. Matching the tool to the scenario saves time, money, and broken parts.
| Puller Type | Best For | Max Capacity | Clearance Needed | Price Range |
|---|---|---|---|---|
| 2-jaw mechanical | Light bearings, asymmetrical parts | Up to 2 tons | Moderate | $15–$40 |
| 3-jaw mechanical | Round bearings, sprockets, pulleys | Up to 5 tons | Good all-around | $40–$120 |
| Hydraulic mechanical | Seized bearings, heavy duty | 2–20+ tons | Moderate to low | $80–$400 |
| Slide hammer | Tight clearance, deep recesses | 1–5 tons | Minimal | $25–$120 |
| Cup puller | Smooth-face bearings without jaws | Up to 3 tons | Low | $20–$60 |
| Harmonic balancer puller | Crankshaft balancers specifically | Varies | Thread engagement | $30–$200 |
The 3-jaw mechanical puller remains the most versatile option for general automotive work. It handles wheel bearings, alternator pulleys, and small gears with equal competence. Its balanced force distribution reduces housing distortion compared to 2-jaw designs.
Most home mechanics should own at least one quality 3-jaw set as their primary removal tool.
Slide hammers excel when jaw placement is physically impossible. They drive through a threaded or hooked attachment point and deliver percussive pulling force. This makes them ideal for cylinder head bolts, old clutch fingers, and components buried behind brackets.
The downside is that impact force can damage delicate threads or crack brittle castings if used carelessly.
Cup pullers grip the outer face of a bearing rather than reaching underneath. This design sidesteps clearance issues entirely. They work well on hub assemblies and certain transmission components where jaw access is blocked.
Their limitation is that they require a flat, smooth bearing face to maintain grip under load.
Hydraulic systems dominate heavy-duty and professional environments. They remove rusted suspension knuckles and pressed-in axle bearings that resist all mechanical attempts. Home mechanics tackling a single major project may rent or borrow a hydraulic kit rather than purchase one.
The force advantage becomes undeniable once you feel the pump handle move a seized part that a mechanical puller could not budge.
Who Should Use What? Puller Picks by Job Type
Matching puller types to specific automotive jobs simplifies decision-making dramatically. Instead of guessing, use this breakdown to select the right tool for your particular task. Each scenario reflects real-world conditions that mechanics encounter regularly.
Wheel bearing removal and replacement: Use a 3-jaw mechanical puller with cup adapters or a slide hammer with bearing extractors. Wheel bearings sit deep inside hubs with limited jaw clearance. A 3-jaw puller reaches around the outer race when space allows.
If the hub assembly blocks jaw placement, switch to a slide hammer with a pulled cup attachment.
Transmission and differential bearings: A hydraulic puller kit proves most effective here. Transmission bearings press tightly onto shafts and often seize from heat cycling. Mechanical pullers struggle to generate enough sustained force.
A 5-ton hydraulic system removes these components cleanly without damaging adjacent seals or synchronizer surfaces.
Harmonic balancer extraction: Purchase a dedicated harmonic balancer puller. These tools thread into the crankshaft and push against the balancer center. Generic pullers slip, strip threads, or crack the balancer casting.
Purpose-built extractor sets cost under $50 and pay for themselves after one successful removal.
Ball joint and tie rod service: Use ball joint separators and tie rod end pullers. These specialty tools apply spreading force directly to the tapered stud without hammer marks on the steering knuckle. Hammering ball joints damages boot seals and introduces premature wear.
Proper separators preserve component integrity during disassembly.
Pulley and sprocket removal: A 2-jaw or 3-jaw mechanical puller handles most accessory drive components. Alternator pulleys, water pump assemblies, and idler brackets respond well to standard jaw arrangements. Ensure the pulley has a lip or machined edge for jaw engagement.
Smooth-faced pulleys require cup attachments or adhesive-backed pulling pads.
U-joint replacement: U-joint pullers or adjustable bearing separators work best for press-fit cross assemblies. Some technicians use large socket and hammer methods, but proper pullers prevent damage to companion flanges and seal surfaces. Specialty picks extract inner races cleanly when replacement bearings are press-fit into new caps.
Choosing the right tool for each job type reduces failure rates and protects expensive vehicle components. Keeping a basic 3-jaw set, a slide hammer, and a hydraulic kit in your inventory covers roughly 90 percent of automotive pulling scenarios. Specialty tools earn their place when specific repeated jobs demand them.
Mistakes That Cost You Parts (and Money)
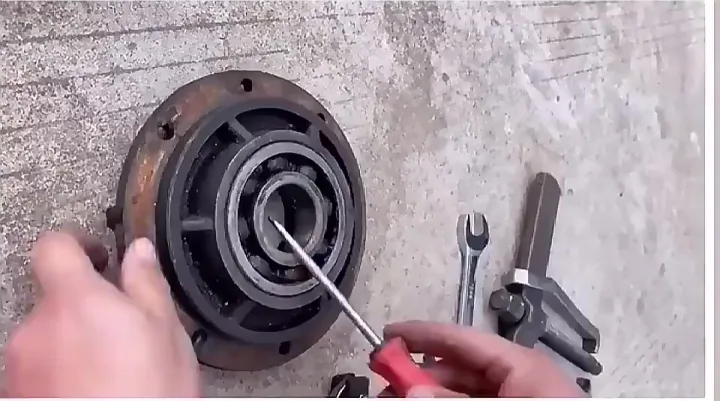
Image source: Web (Bing) / lazada.com.ph (Web image (fair-use with source credit))
Using the wrong puller technique causes more damaged parts than any tool failure. Even experienced mechanics waste bearings and crack housings by skipping fundamentals. Learning these common errors early keeps your projects on budget and on schedule.
The most destructive mistake is forcing a puller beyond its capacity. When a mechanical puller stalls under extreme resistance, adding a cheater bar or striking the screw with a hammer creates catastrophic stress. The puller arm snaps, the threaded screw strips, and the component often shatters from uneven impact.
Back off, apply penetrating oil, and consider thermal expansion or a hydraulic upgrade instead.
Misaligned jaw placement produces uneven pulling force that tilts the component off-center. This wedges the bearing race against the housing shoulder and creates scraping damage on both surfaces. Always position jaws symmetrically and verify alignment before applying torque.
Rotate the puller manually first to confirm the screw stays centered on the shaft.
Ignoring clearance limitations leads to forced installations that warp thin aluminum housings. Forcing a 3-jaw puller into a tight space bends the arms and distorts the mounting bracket. Measure your workspace before selecting a tool.
If jaws cannot engage freely, choose a slide hammer or cup puller designed for restricted access.
Stripping the center screw thread is a frequent and expensive error. Using a damaged or incorrectly sized screw creates cross-threading during initial engagement. Inspect threads before every use and lubricate the screw lightly with anti-seize compound.
Never use an impact driver on puller screws. Hand torque only ensures proper thread alignment and prevents rounding.
Over-tightening after the component frees causes secondary damage. Once a bearing pops loose, continuing to crank the screw slams the puller arms against the housing. This chips paint, dents brackets, and risks cracking cast aluminum components.
Stop applying force the moment the part breaks free. Back the screw out slowly and remove the puller assembly.
Using worn or cracked puller jaws compromises grip and increases slip risk. Damaged jaws deform under load and reduce contact surface area. Check jaw tips for wear before each job.
Replace bent or cracked arms immediately. A $15 jaw replacement costs far less than a ruined bearing and destroyed housing.
Avoiding these pitfalls extends tool life and protects vehicle components. Proper selection, careful alignment, and knowing when to switch strategies separates successful removals from costly failures.
Frequently Asked Questions
What is the difference between a 2-jaw and 3-jaw puller?
A 2-jaw puller has two arms and works best for asymmetrical parts or tight spaces. A 3-jaw puller has three arms and applies even, centered force ideal for round bearings and sprockets. Both use a central screw to generate pulling force.
Can I use a bearing puller to remove a gear?
Yes, as long as the gear has a lip or edge the jaws can grip. Smooth-faced gears require cup pullers or adhesive pads. Make sure the puller's tonnage rating exceeds the gear's resistance to removal.
How much force do I need to remove a seized bearing?
Most seized automotive bearings require 2 to 5 tons of pulling force. A standard mechanical puller handles light cases. Heavily rusted or heat-cycled bearings often need a hydraulic puller rated for 5 to 10 tons to break free safely.
Are hydraulic pullers worth the extra cost?
Hydraulic pullers cost 2 to 4 times more than mechanical versions but deliver consistent high force with minimal effort. If you pull seized bearings weekly, the investment pays for itself quickly. Occasional users can rent or borrow one for heavy jobs.
How do I prevent a puller from slipping during use?
Ensure jaws are fully seated under the component edge before tightening. Lubricate the screw thread lightly. Apply torque gradually rather than suddenly.
Replace worn or rounded jaw tips that cannot maintain secure grip on smooth surfaces.
What should I do if a puller won't budge a stubborn part?
Stop applying force immediately. Apply penetrating oil and wait 15 to 30 minutes. Try heating the outer housing with a propane torch to expand it slightly.
Switch to a higher-capacity hydraulic puller or consult a professional if the component remains stuck.
